Portkey and Future AGI: End-to-End LLM Observability
Combine Portkey and Future AGI for end-to-end LLM observability. Benchmark multiple models on response quality, latency, and cost.
Combining Portkey and FutureAGI creates a complete, end-to-end observability solution for your LLM applications, covering both operational performance and response quality. They are uniquely powerful together because they answer two different, but equally critical, questions:
-
Portkey answers: “What happened, how fast, and how much did it cost?”
As an AI gateway, Portkey acts as the operational layer. It unifies your API calls, manages your keys, and gives you a centralized dashboard to monitor crucial operational metrics like latency, cost, and request volume.
-
FutureAGI answers: “How good was the response?”
As a tracing and evaluation platform, FutureAGI acts as the quality layer. It captures the full context of each request and runs automated evaluations to score the model’s output on modalities like audio, image and text. It also provides custom evaluation metrics for the data.
In this cookbook we’ll learn
Our goal is to create a system that can:
- Test multiple LLMs (like GPT-4o, Claude 3.7 Sonnet, Llama) concurrently on a variety of tasks.
- Measure performance metrics like response time and token usage.
- Automatically evaluate the quality of each model’s response using FutureAGI’s built-in evaluators (e.g., conciseness, context adherence, task completion).
- Generate a comprehensive comparison report to easily identify the best model for a given set of tasks.
Core Concepts
- Portkey : An AI Gateway that provides a single, unified API to interact with various LLM providers. It simplifies key management through Virtual Keys, adds resilience with fallbacks/retries, and caches responses to save costs.
- Future AGI Tracing: An AI lifecycle platform designed to support enterprises throughout their AI journey. It combines rapid prototyping, rigorous evaluation, continuous observability, and reliable deployment to help build, monitor, optimize, and secure generative AI applications.
Prerequisites
-
Python Environment: Ensure you have Python 3.8+ installed.
-
API Keys:
- A Portkey API Key.
- Virtual Keys for each provider you want to test (OpenAI, Anthropic, VertexAI, Groq, etc.) set up in your Portkey dashboard (https://app.portkey.ai/virtual-keys).
- Future AGI API Key (https://app.futureagi.com/dashboard/keys).
-
Install Libraries:
pip install portkey-ai fi-instrumentation traceai-portkey -
.envFile: Create a.envfile in your project root to securely store your Portkey API Key.# .env PORTKEY_API_KEY="your-portkey-api-key" FI_API_KEY="your-fagi-api-key" FI_SECRET_KEY="your-fagi-secret-key"
Step-by-Step Guide
You can utilize this colab notebook to run the instrumentation for portkey in futureagi
Step 1: Basic Setup and Imports
First, we’ll import the necessary libraries and configure logging. We use dataclasses to create structured objects for our model configurations and test results, which makes the code cleaner and more maintainable.
import asyncio
import json
import time

from portkey_ai import Portkey
from traceai_portkey import PortkeyInstrumentor
from fi_instrumentation import register
from fi_instrumentation.fi_types import ProjectType, EvalTag, EvalTagType, EvalSpanKind, EvalName, ModelChoices
from dotenv import load_dotenv

load_dotenv()
Step 2: Setting Up Tracing with FutureAGI Evals
This is the most critical step for automated evaluation. The setup_tracing method configures FutureAGI.
register(): Initializes a tracing project. We give it aproject_nameand aproject_version_nameto organize our experiments.eval_tags: This is where the magic happens. We define a list ofEvalTagobjects that tell FutureAGI what to evaluate.
Let’s break down one EvalTag:
EvalTag(
    type=EvalTagType.OBSERVATION_SPAN,
    value=EvalSpanKind.LLM,
    eval_name=EvalName.CONTEXT_ADHERENCE,
    custom_eval_name="Response_Quality",
    mapping={
        "context": "llm.input_messages.0.message.content",
        "output": "llm.output_messages.0.message.content",
    },
    model=ModelChoices.TURING_LARGE
)
type&value: Specifies that this evaluation should run on every LLM call span.eval_name: The built-in evaluation to use (e.g.,CONTEXT_ADHERENCE).custom_eval_name: A user-friendly name that will appear in the FutureAGI dashboard (e.g., “Response_Quality”).mapping: This is crucial. It tells the evaluator where to find the necessary data within the trace. Here, we map the LLM’s input prompt to thecontextparameter of the evaluator and the LLM’s response to theoutputparameter.PortkeyInstrumentor().instrument(): This line activates the instrumentation, linking our FutureAGI setup to any Portkey client created afterward.
def setup_tracing(self, project_version_name: str):
	    """Setup tracing with comprehensive evaluation tags"""
        tracer_provider = register(
            project_name="Model-Benchmarking",
            project_type=ProjectType.EXPERIMENT,
            project_version_name=project_version_name,
            eval_tags=[
                # Evaluates if the response is concise
                EvalTag(
                    type=EvalTagType.OBSERVATION_SPAN, value=EvalSpanKind.LLM,
                    eval_name=EvalName.IS_CONCISE, custom_eval_name="Is_Concise",
                    mapping={"input": "llm.output_messages.0.message.content"},
                    model=ModelChoices.TURING_LARGE
                ),
                # Evaluates if the response adheres to the context/prompt
                EvalTag(
                    type=EvalTagType.OBSERVATION_SPAN, value=EvalSpanKind.LLM,
                    eval_name=EvalName.CONTEXT_ADHERENCE, custom_eval_name="Response_Quality",
                    mapping={
                        "context": "llm.input_messages.0.message.content",
                        "output": "llm.output_messages.0.message.content",
                    },
                    model=ModelChoices.TURING_LARGE
                ),
                # Evaluates if the model completed the instructed task
                EvalTag(
                    type=EvalTagType.OBSERVATION_SPAN, value=EvalSpanKind.LLM,
                    eval_name=EvalName.TASK_COMPLETION, custom_eval_name="Task_Completion",
                    mapping={
                        "input": "llm.input_messages.0.message.content",
                        "output": "llm.output_messages.0.message.content",
                    },
                    model=ModelChoices.TURING_LARGE
                ),
            ]
        )
        # Instrument the Portkey library
        PortkeyInstrumentor().instrument(tracer_provider=tracer_provider)
        return tracer_provider
Step 3: Defining Models and Test Scenarios
We define the models we want to test and the prompts for our test scenarios. This structure makes it easy to add or remove models and tests. (Feel Free to add more test prompts on your own)
def get_models(self) -> List[ModelConfig]:
    """Setup model configurations with their Portkey Virtual Keys"""
    # Replace ### with your actual portkey virtual Key IDs
    return [
        {"name": "GPT-4o", "provider": "OpenAI", "virtual_key": "openai-virtu-###", "model_id": "gpt-4o"},
        {"name": "Claude-3.7-Sonnet", "provider": "Anthropic", "virtual_key": "anthropic-virtu-###", "model_id": "claude-3-7-sonnet-latest"},
        {"name": "Llama-3-70b", "provider": "Groq", "virtual_key": "groq-virtu-###", "model_id": "llama3-70b-8192"},
    ]

def get_test_scenarios():
    """Returns a dictionary of test scenarios."""
    return {
        "reasoning_logic": "A farmer has 17 sheep. All but 9 die. How many are left?",
        "creative_writing": "Write a 6-word story about a robot who discovers music.",
        "code_generation": "Write a Python function to find the nth Fibonacci number.",
    }
Step 4: Executing a Test and Capturing Results
The test_model function orchestrates a single test run.
- It creates a
Portkeyclient using the model-specific Virtual Key. - It constructs the request payload.
- It calls
client.chat.completions.create(). Because of our instrumentation in Step 2, this call is automatically traced. - It measures the time taken and parses the response and token usage.
- It returns a structured
TestResultobject.
async def test_model(model_config, prompt):
    """Tests a single model with a single prompt and returns the response."""

    tracer_provider = setup_tracing(model_config["name"])

    print(f"Testing {model_config['name']}...")

    client = Portkey(virtual_key=model_config['virtual_key'])
    start_time = time.time()

    completion = await client.chat.completions.create(
        messages=[{"role": "user", "content": prompt}],
        model=model_config['model_id'],
        max_tokens=1024,
        temperature=0.5
    )
    response_time = time.time() - start_time
    response_text = completion.choices[0].message.content or ""

    return response_text
Step 4: Orchestrate with a main Function
The main function ties everything together. It gets the models and scenarios, then loops through them, calling our test_model function for each combination.
async def main():
    """Main execution function to run all tests."""
    models_to_test = get_models()
    scenarios = get_test_scenarios()

    for test_name, prompt in scenarios.items():
        print(f"\n{'='*20} SCENARIO: {test_name.upper()} {'='*20}")
        print(f"PROMPT: {prompt}")
        print("-" * 60)

        for model in models_to_test:
            await test_model(model, prompt)

        await asyncio.sleep(1) # Brief pause between scenarios
        PortkeyInstrumentor().uninstrument()
        # Cleanup Instrumentation between each model testing

if __name__ == "__main__":
    asyncio.run(main())
After running the script, you have two powerful views to analyze the performance.
- FutureAGI Dashboard - The Quality View
Navigate to Prototype Tab in your Future AGI Dashboard. You will find your project named “Model-Benchmarking”
Inside this project you can check each run to be under the project version, with the name representing the model name
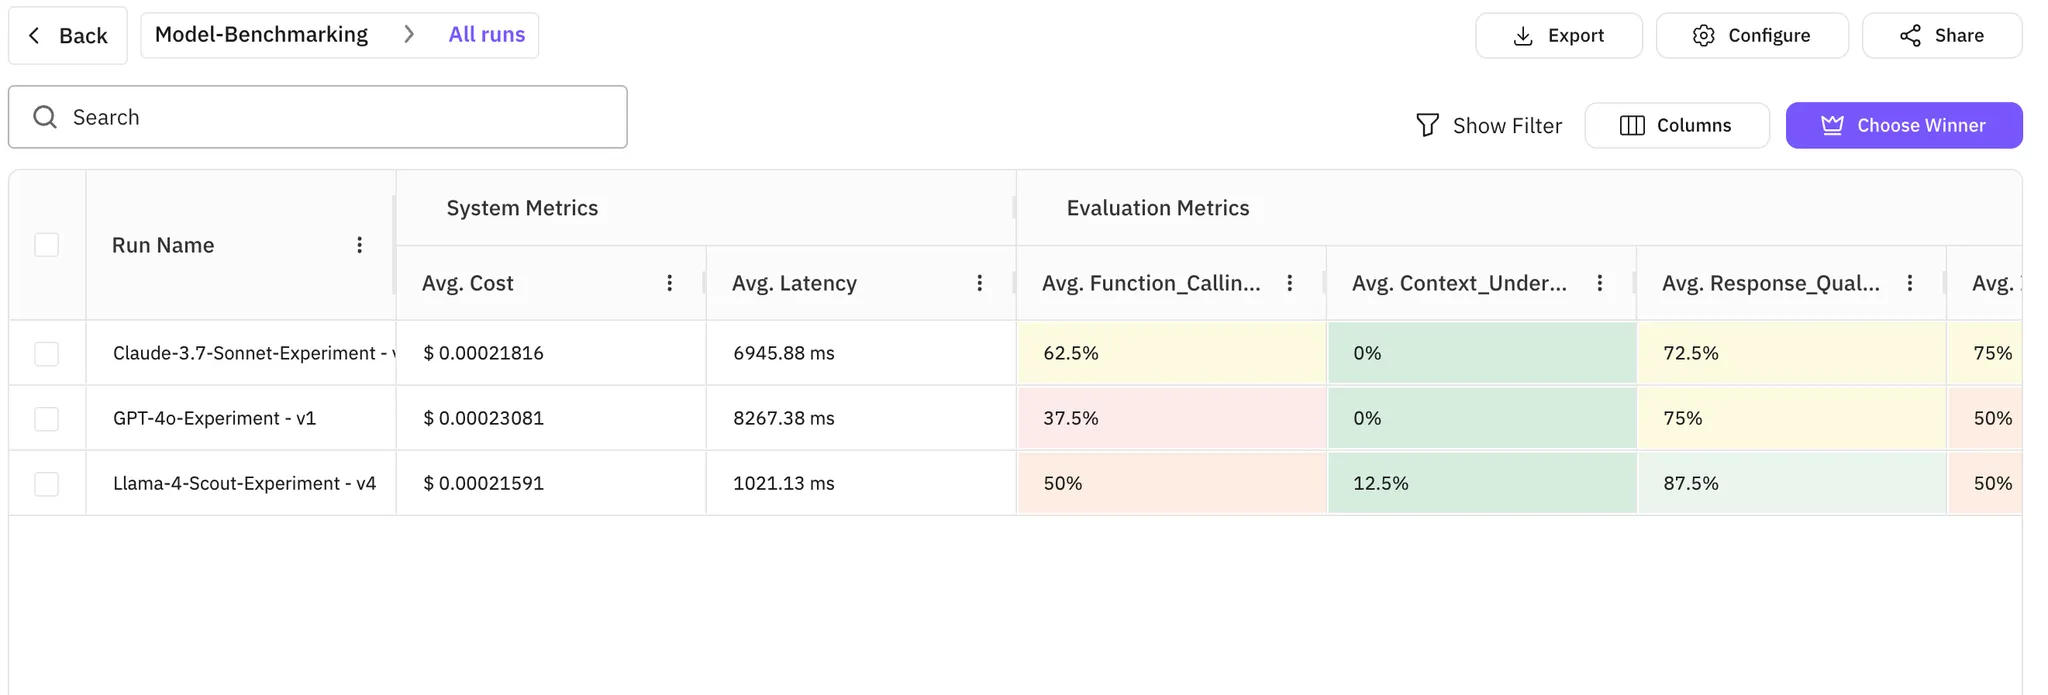
Future AGI Prototype Dashboard to check your evaluation metrics and do run compariosn
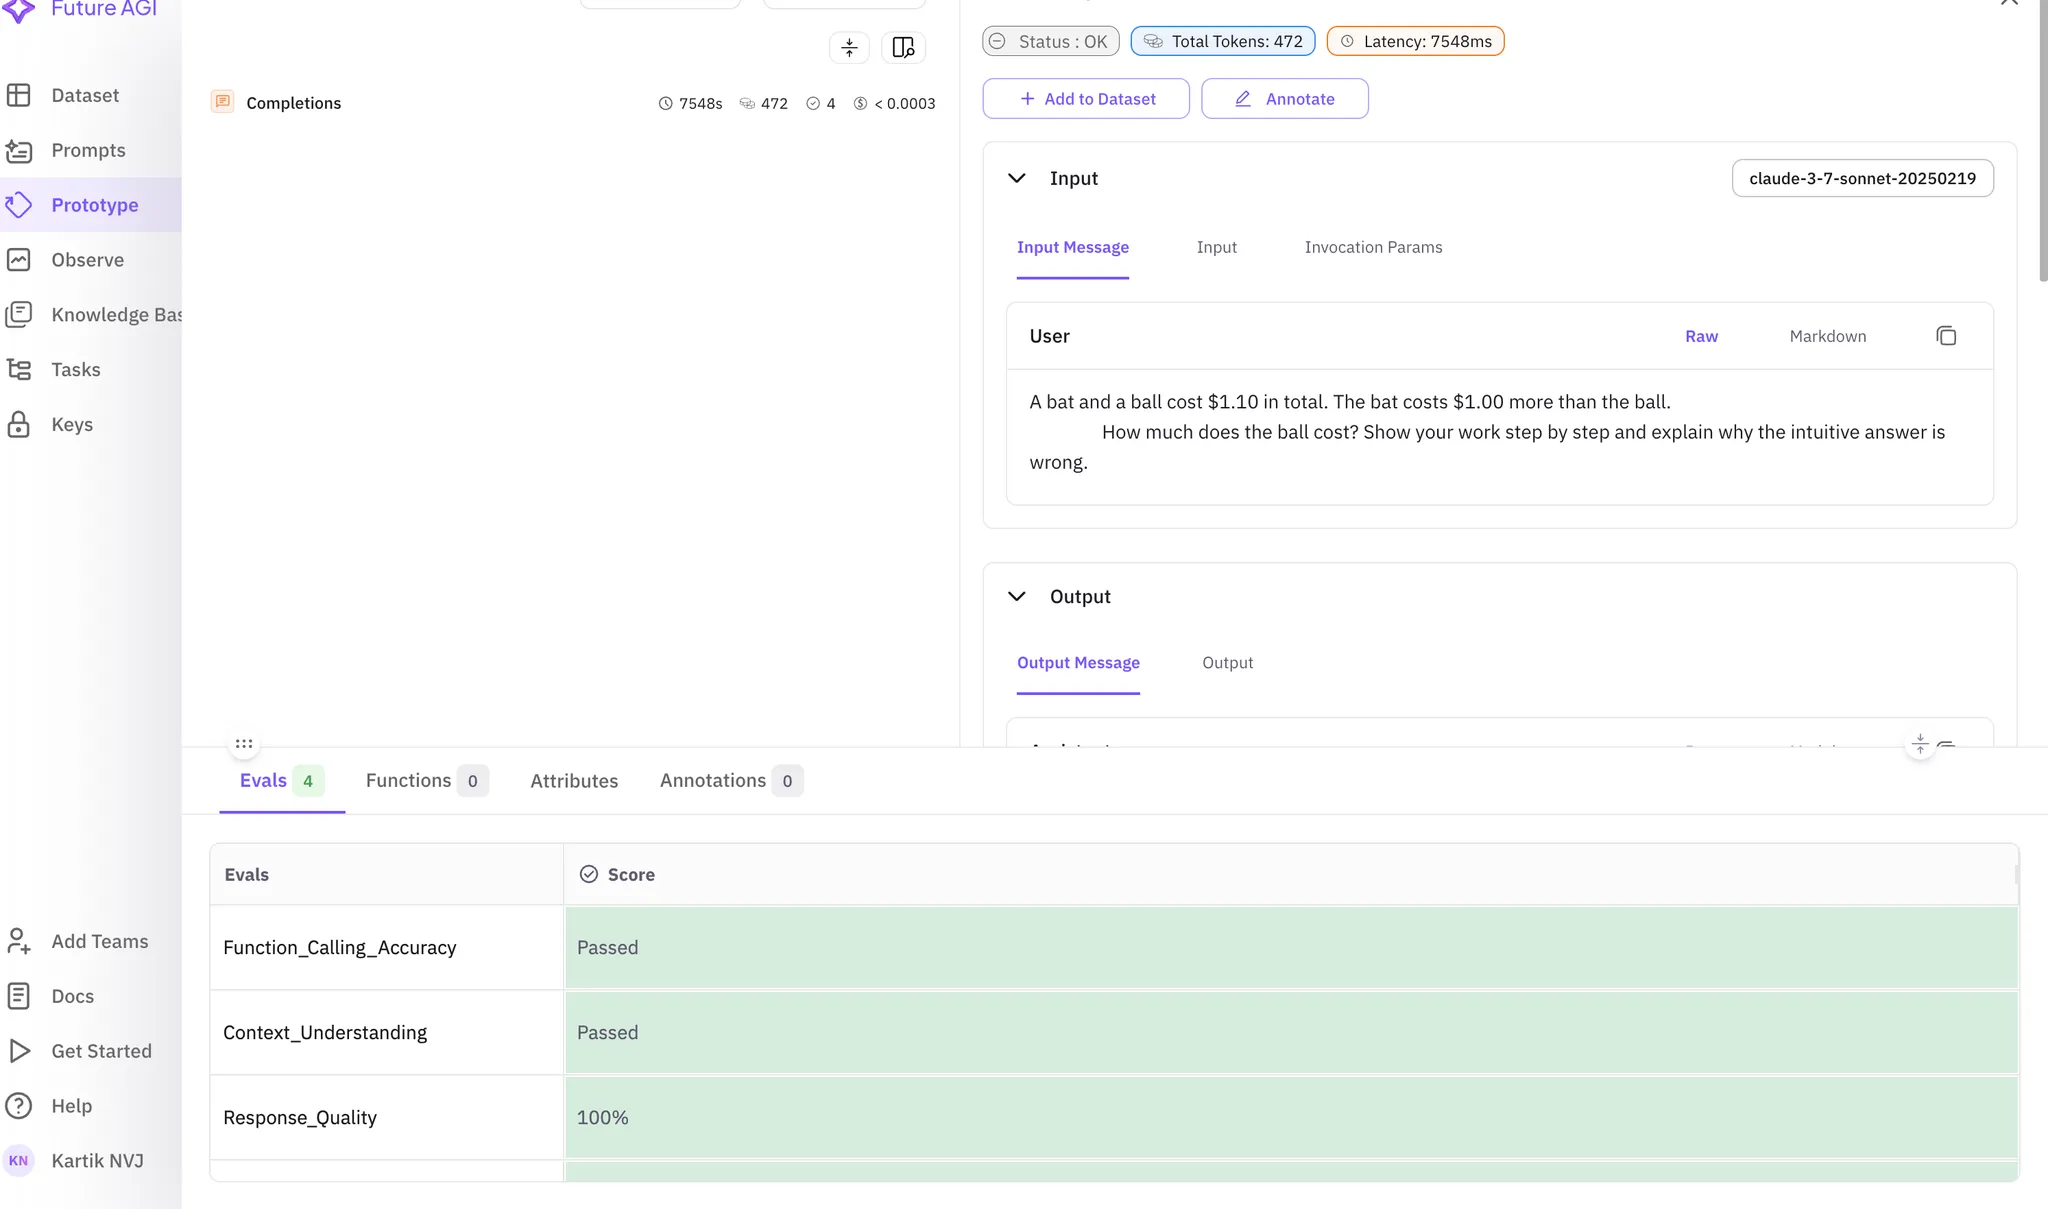
Trace Analysis
Click into the experiment to see traces for each API call. In the trace details, you’ll find the results of your automated EvalTags (Response_Quality, Task_Completion), giving you an objective score for the model’s performance.
Trace tree dashboard to get a detailed view for individual event for your runs
With this you can setup a complex workflow where you chain llm calls to create an agentic AI system and trace them into the Future AGI dashboard to build production ready systems very easily
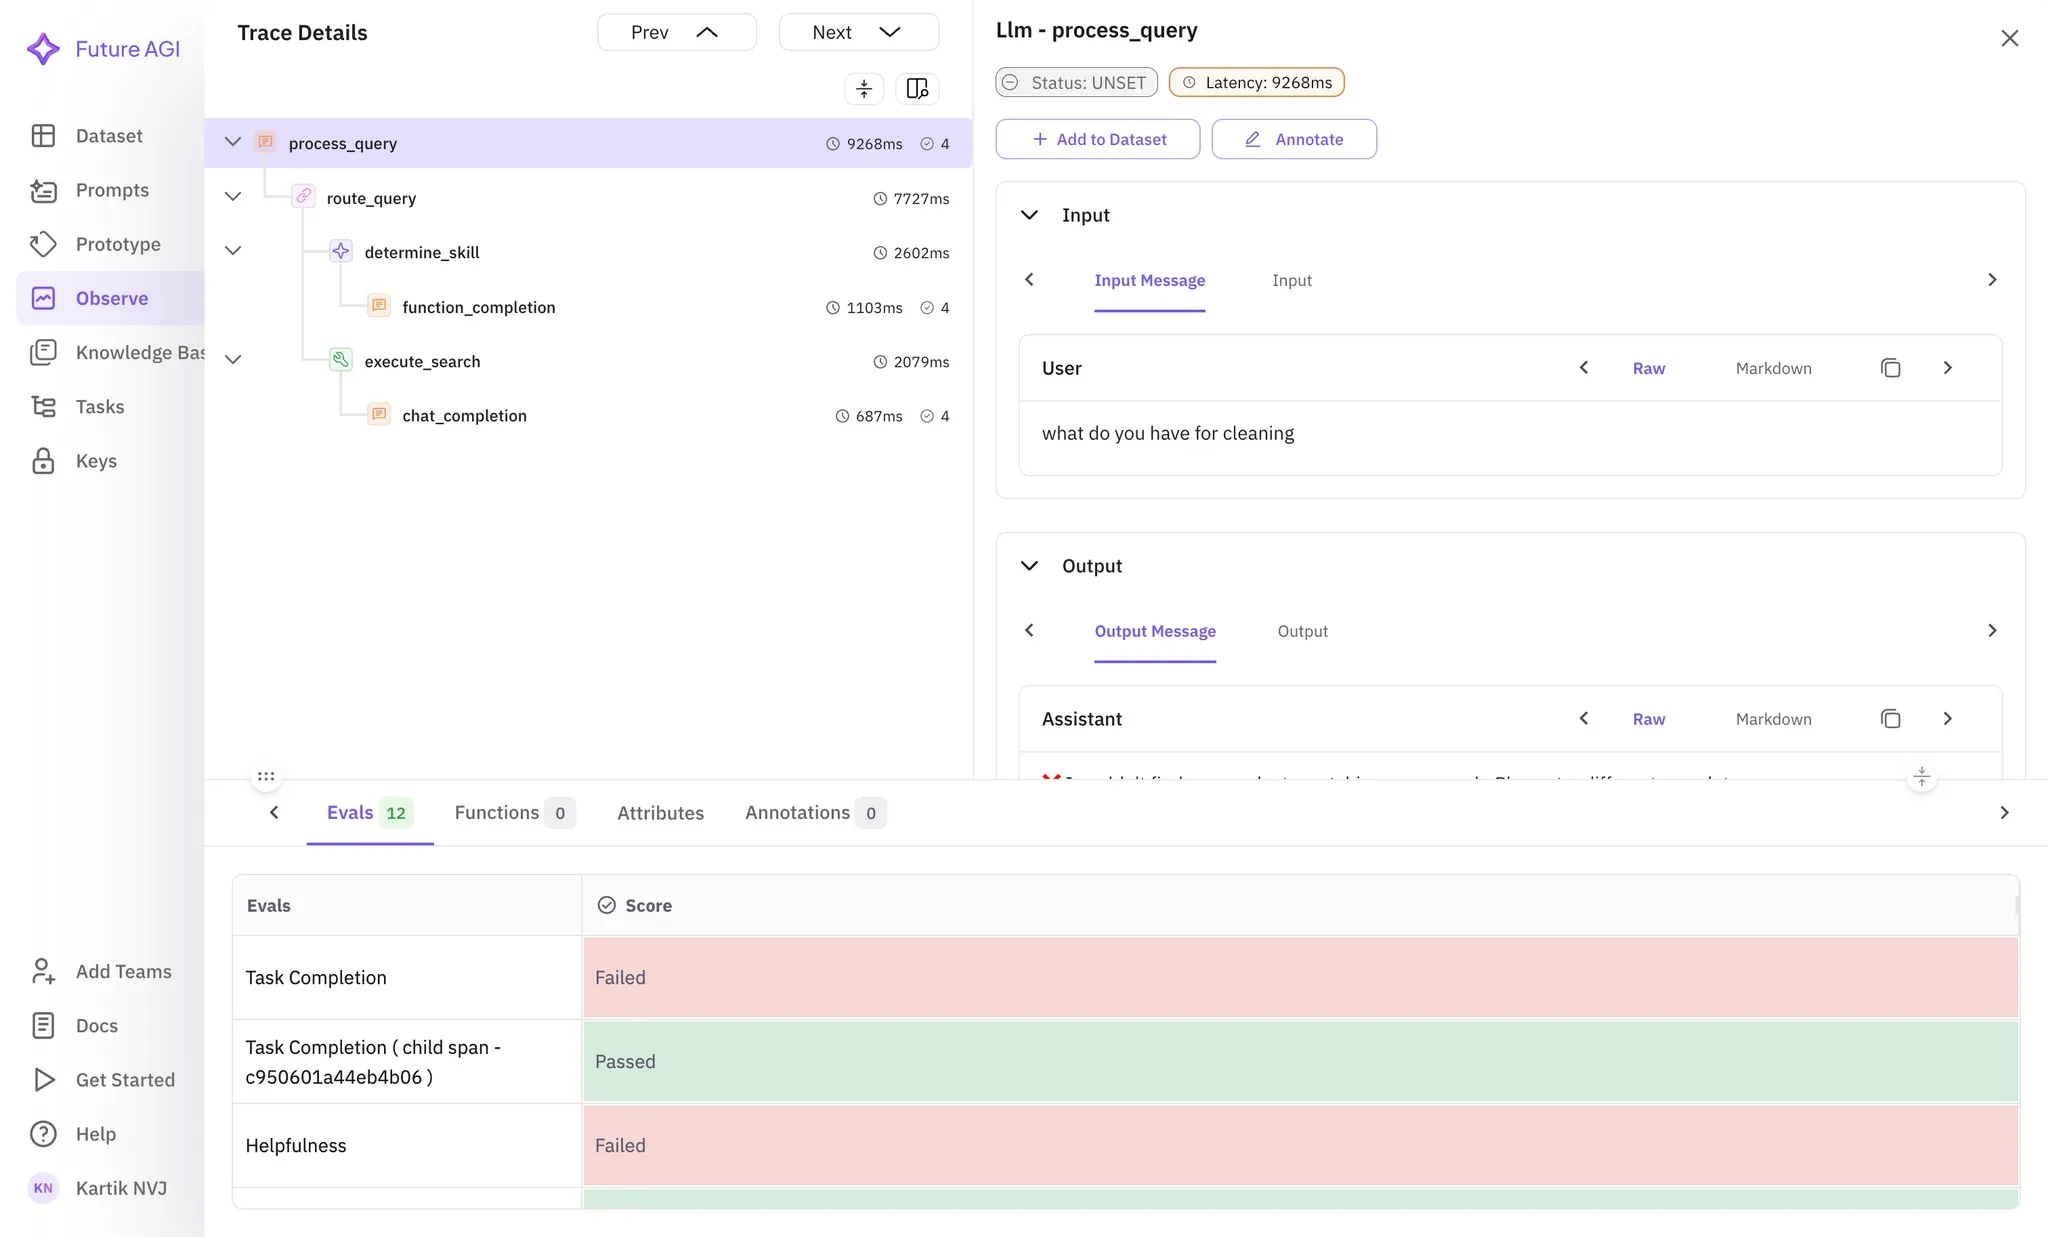
A complex workflow for a E-commerce assistant using Portkey’s LLM Gateway
Portkey Dashboard - The Operational View
Navigate to your Portkey dashboard to see the operational metrics for all the API calls.
- Unified Logs: See a single, unified log of all requests sent to OpenAI, Anthropic, and Groq.
- Cost and Latency: Portkey automatically tracks the cost and latency for every single call, allowing you to easily compare these crucial operational metrics.
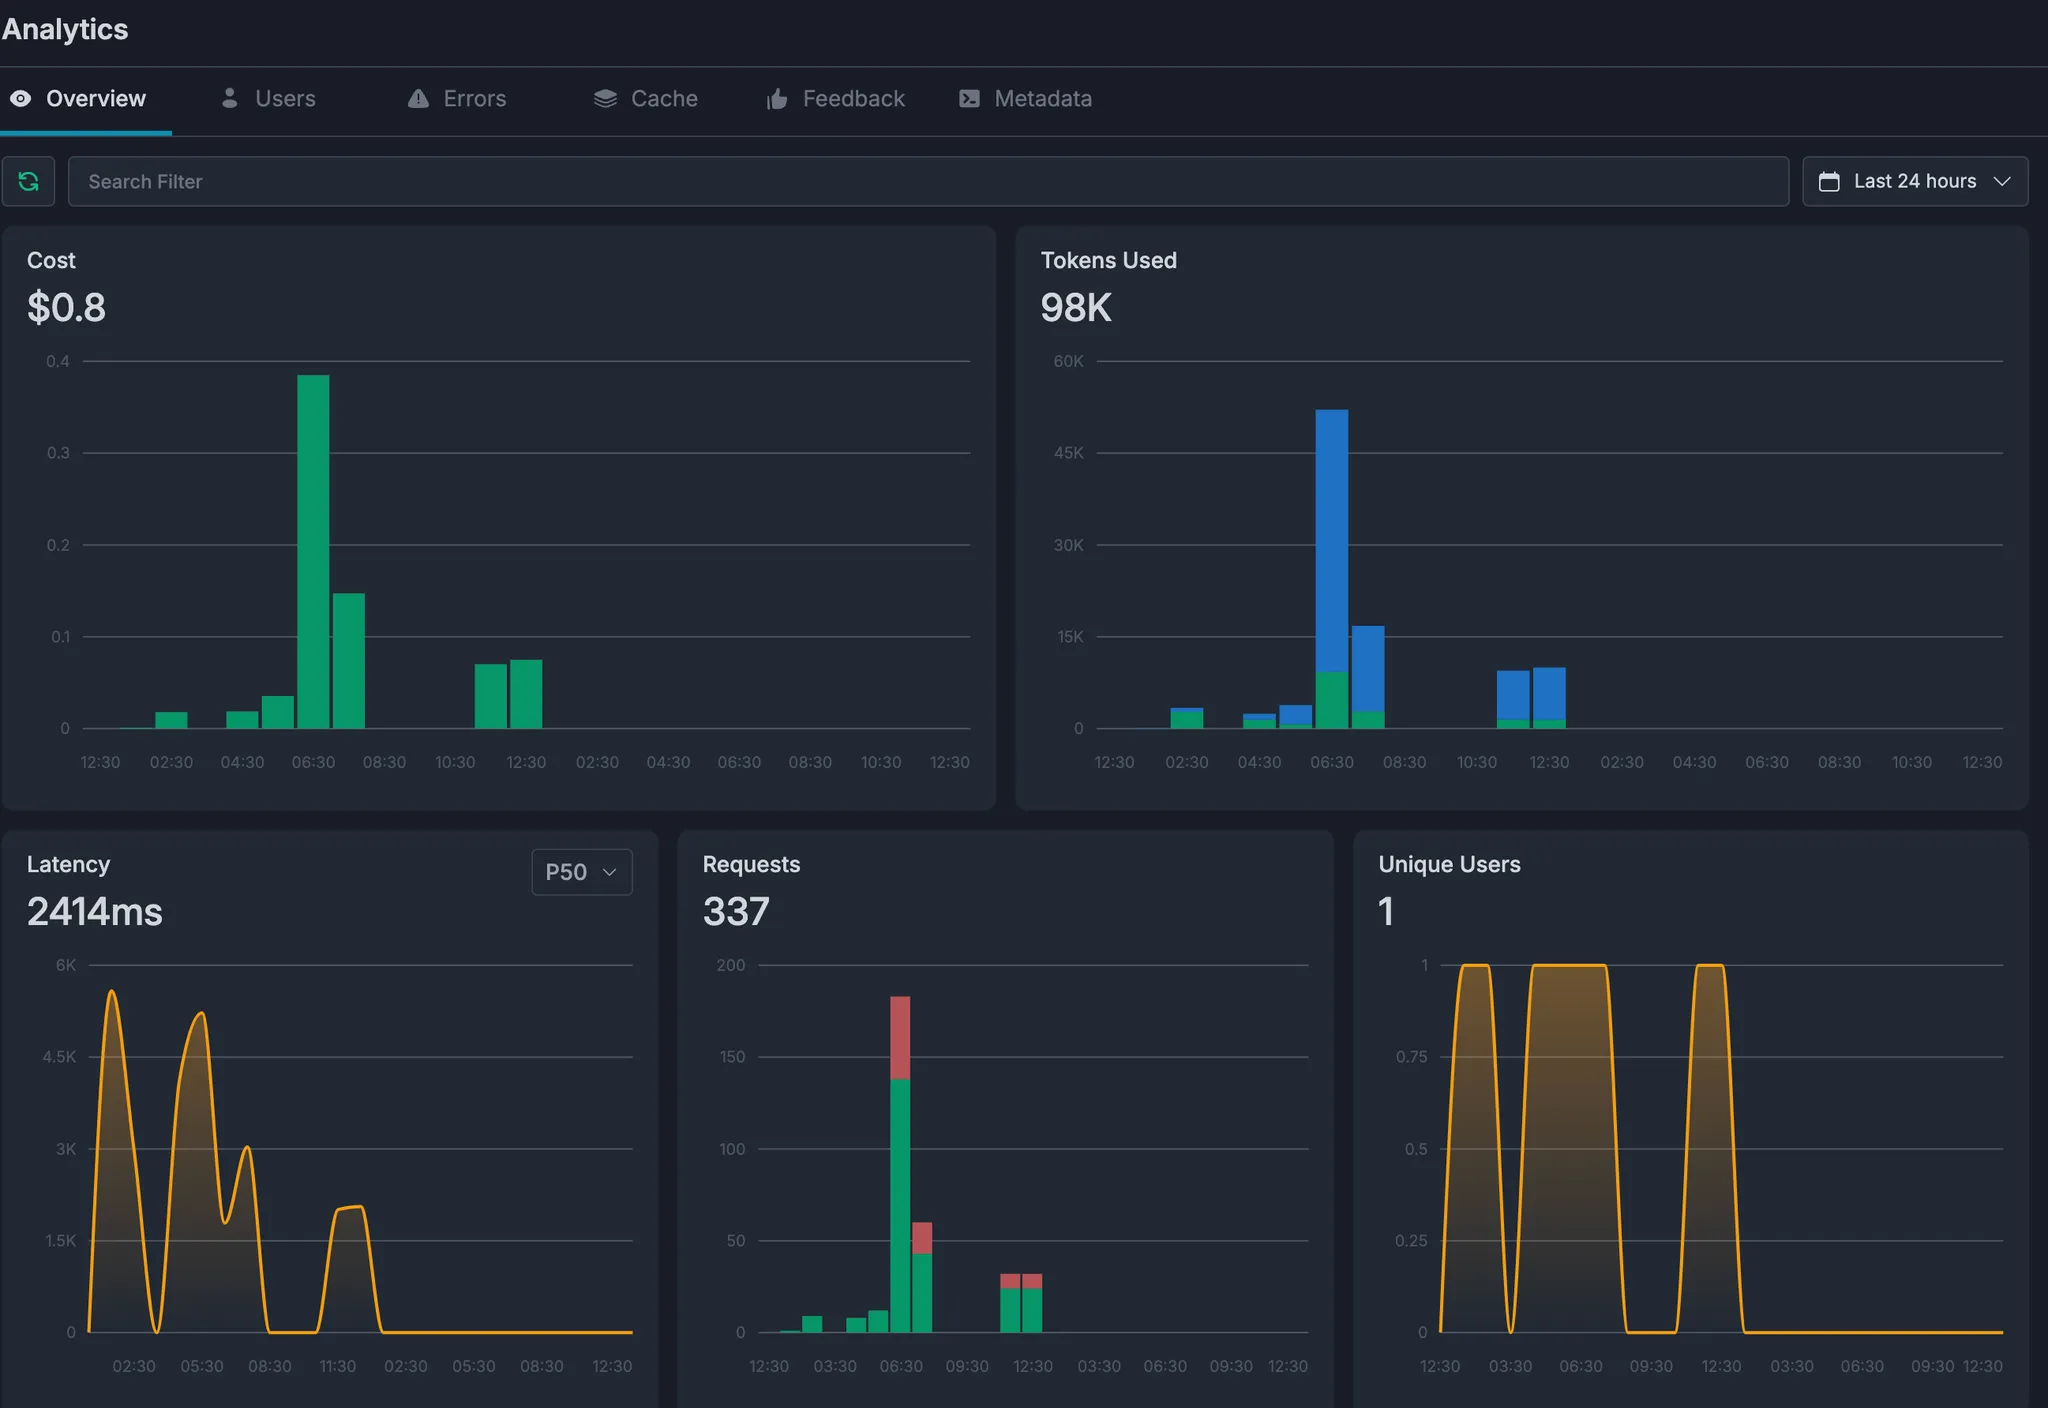
PortKey Dashboard to Monitor your operational metrics like latency, costs, and tokens utilized
How Utilizing Portkey and FutureAGI will help enhancing your CI/CD pipelines
The scripts can be significantly enhanced by leveraging the gateway provided by Portkey, which offers automated setup capabilities. This automation streamlines the process of integrating and managing pipelines, reducing manual intervention and potential errors. Additionally, incorporating Future AGI into the evaluation of these pipelines can provide advanced insights and recommendations for optimization. Future AGI, along with Portkey, offers comprehensive alerts and monitoring systems for your pipelines. These systems are designed to help you keep track of critical metrics such as costs, latency, and quality. By continuously monitoring these aspects, you can ensure that your production environments operate efficiently and effectively, especially during critical moments when performance and reliability are paramount.
Conclusion
By combining Portkey’s unified API and FutureAGI’s powerful tracing and evaluation engine, you can create a sophisticated, automated, and scalable LLM benchmarking suite. This cookbook provides the foundation to compare models effectively, make data-driven decisions, and continuously monitor model performance over time. You can easily extend this by adding more complex test scenarios, custom evaluation functions, or different models.
Questions & Discussion