Overview
FutureAGI offers both manual and automatic scenario generation capabilities, making it easy to create comprehensive test suites for any use case. A scenario is a structured test case that simulates real-world interactions your agent will face. Each scenario includes:- Personas: The role and characteristics of the customer/user
- Situations: The context and circumstances of the interaction
- Outcomes: The expected results and success criteria
- Different customer demographics and needs
- Various objection patterns
- Edge cases and difficult situations
- Compliance verification tests
Types of Scenarios
1. Workflow Builder (Automatic Generation)
The Workflow Builder is FutureAGI’s most powerful scenario creation tool, offering both automatic and manual scenario generation capabilities. This is the recommended approach for creating comprehensive test suites.Automatic Scenario Generation
FutureAGI can automatically generate scenarios based on your agent definition and requirements: Navigate to Simulations → Scenarios → Add Scenario Select “Workflow Builder” as your scenario type: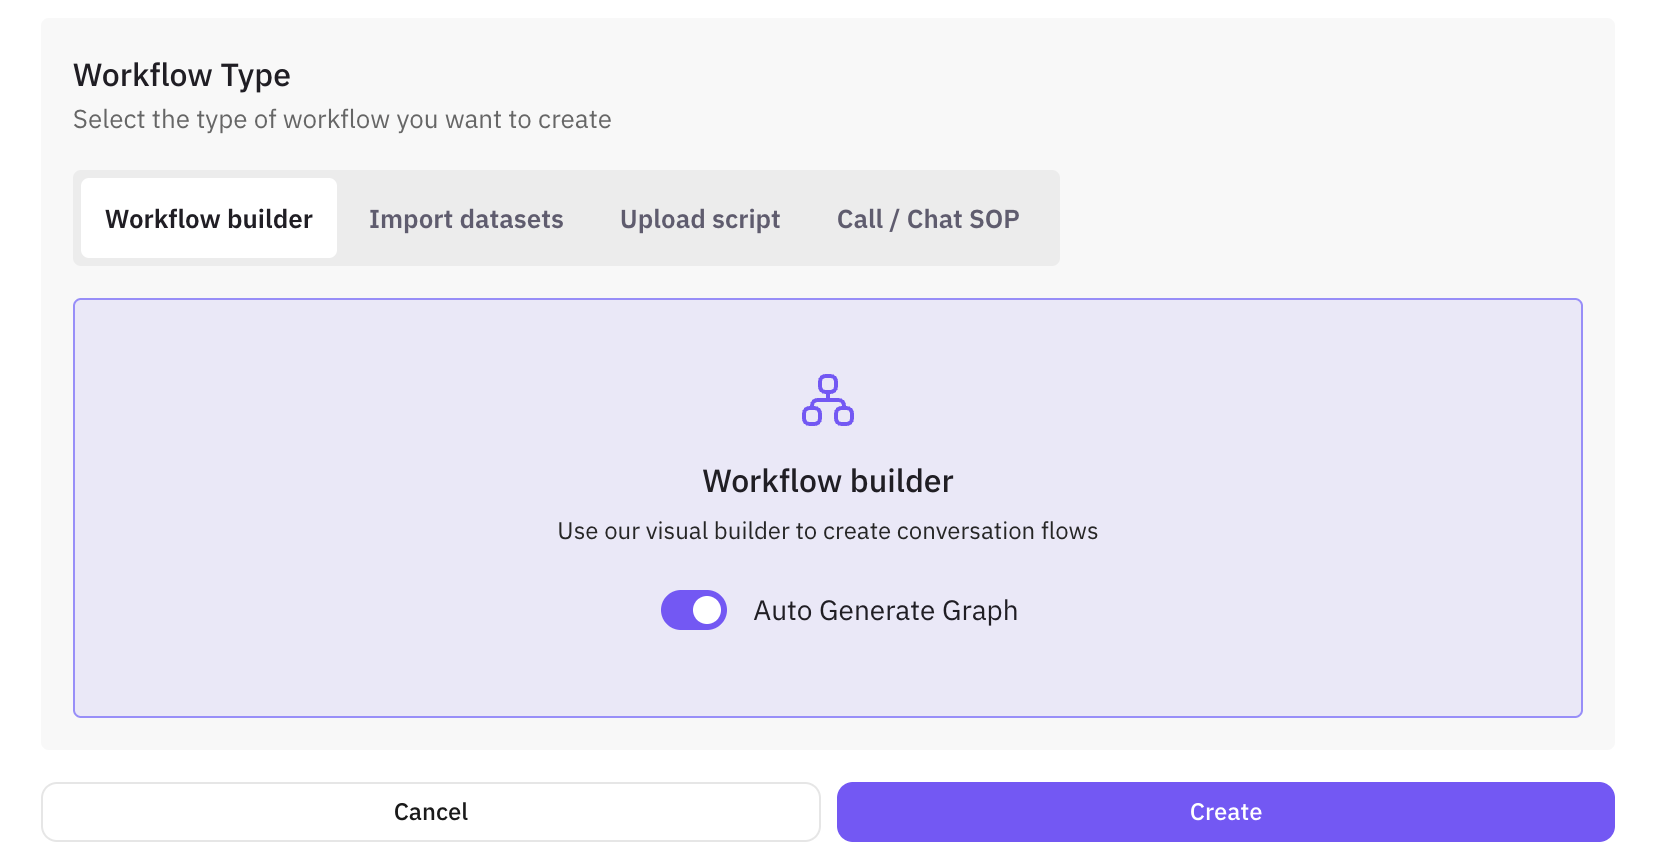
Auto-Generate Scenarios
Enable “Auto Generate Graph” to let FutureAGI create scenarios automatically:- Agent Definition: Select your agent definition
- Number of Rows: Specify how many scenarios to generate (e.g., 20, 50, 100)
- Scenario Description: Provide a brief description of what you want to test
- Click Generate: FutureAGI will automatically create:
- Multiple conversation paths
- Diverse customer personas (automatically generated)
- Realistic situations and contexts (automatically generated)
- Expected outcomes for each scenario (automatically generated)
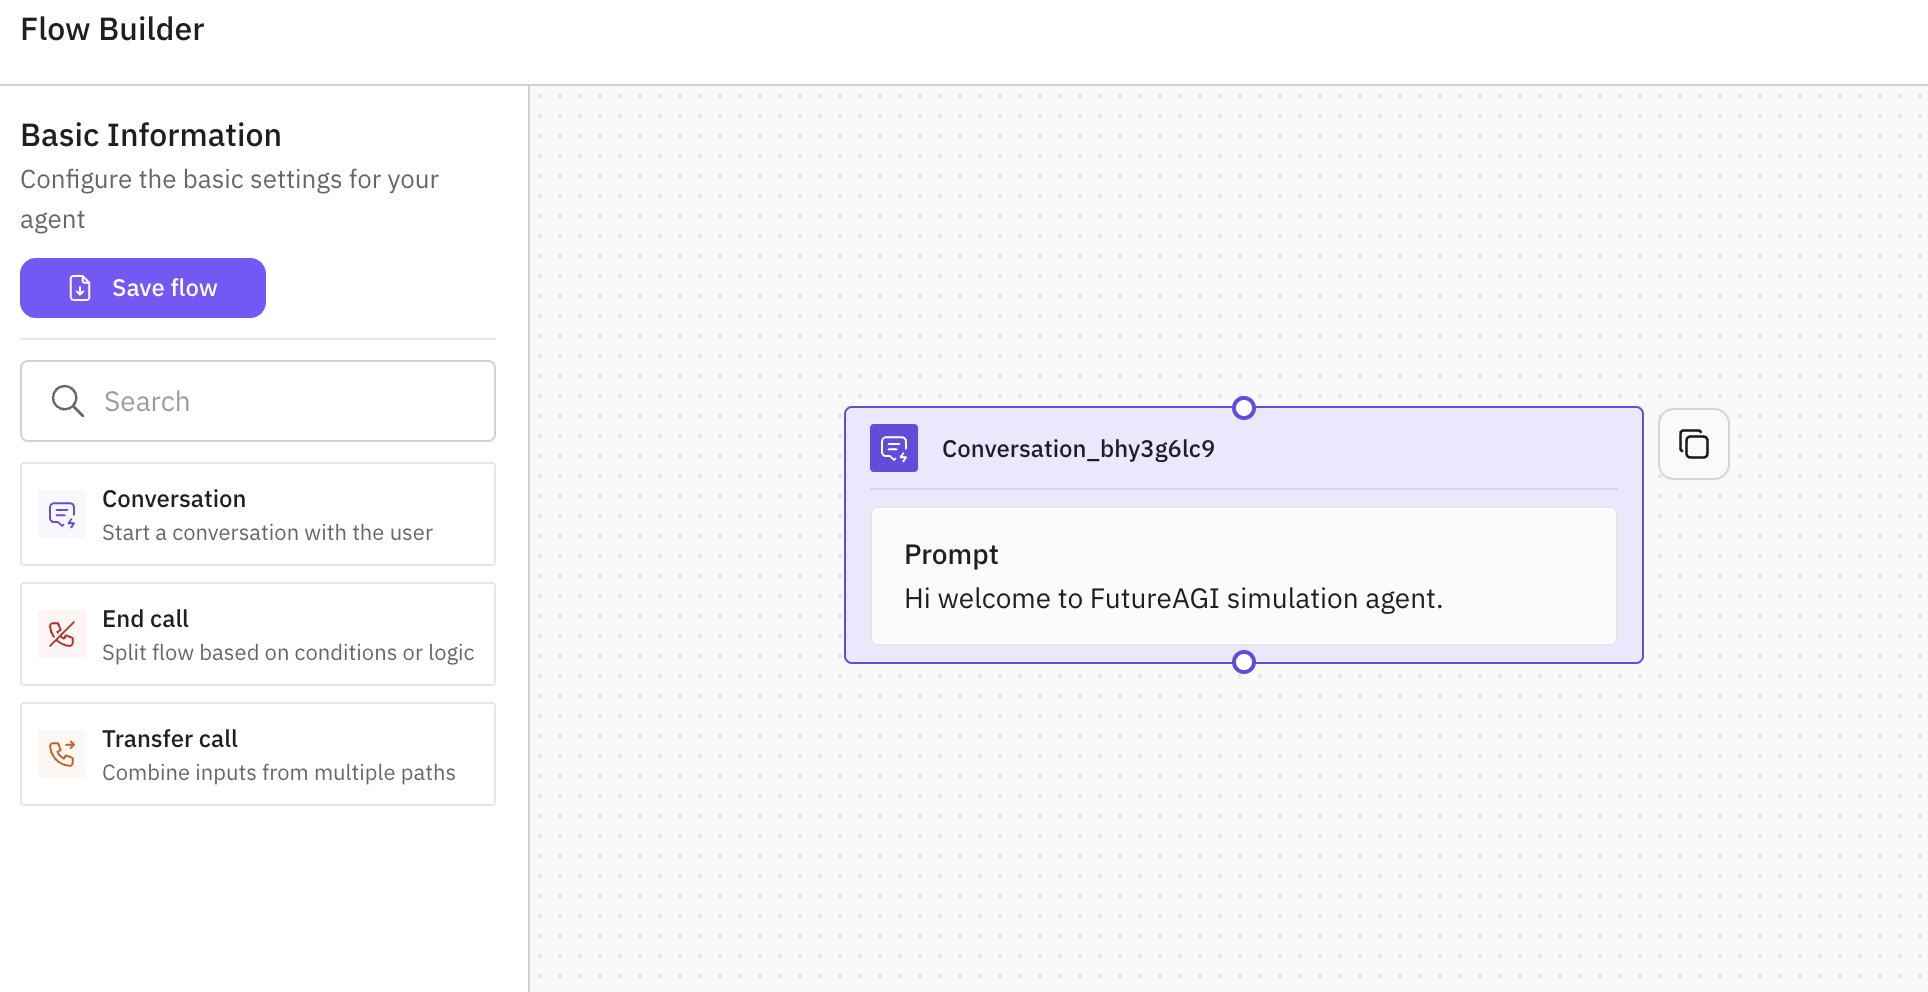
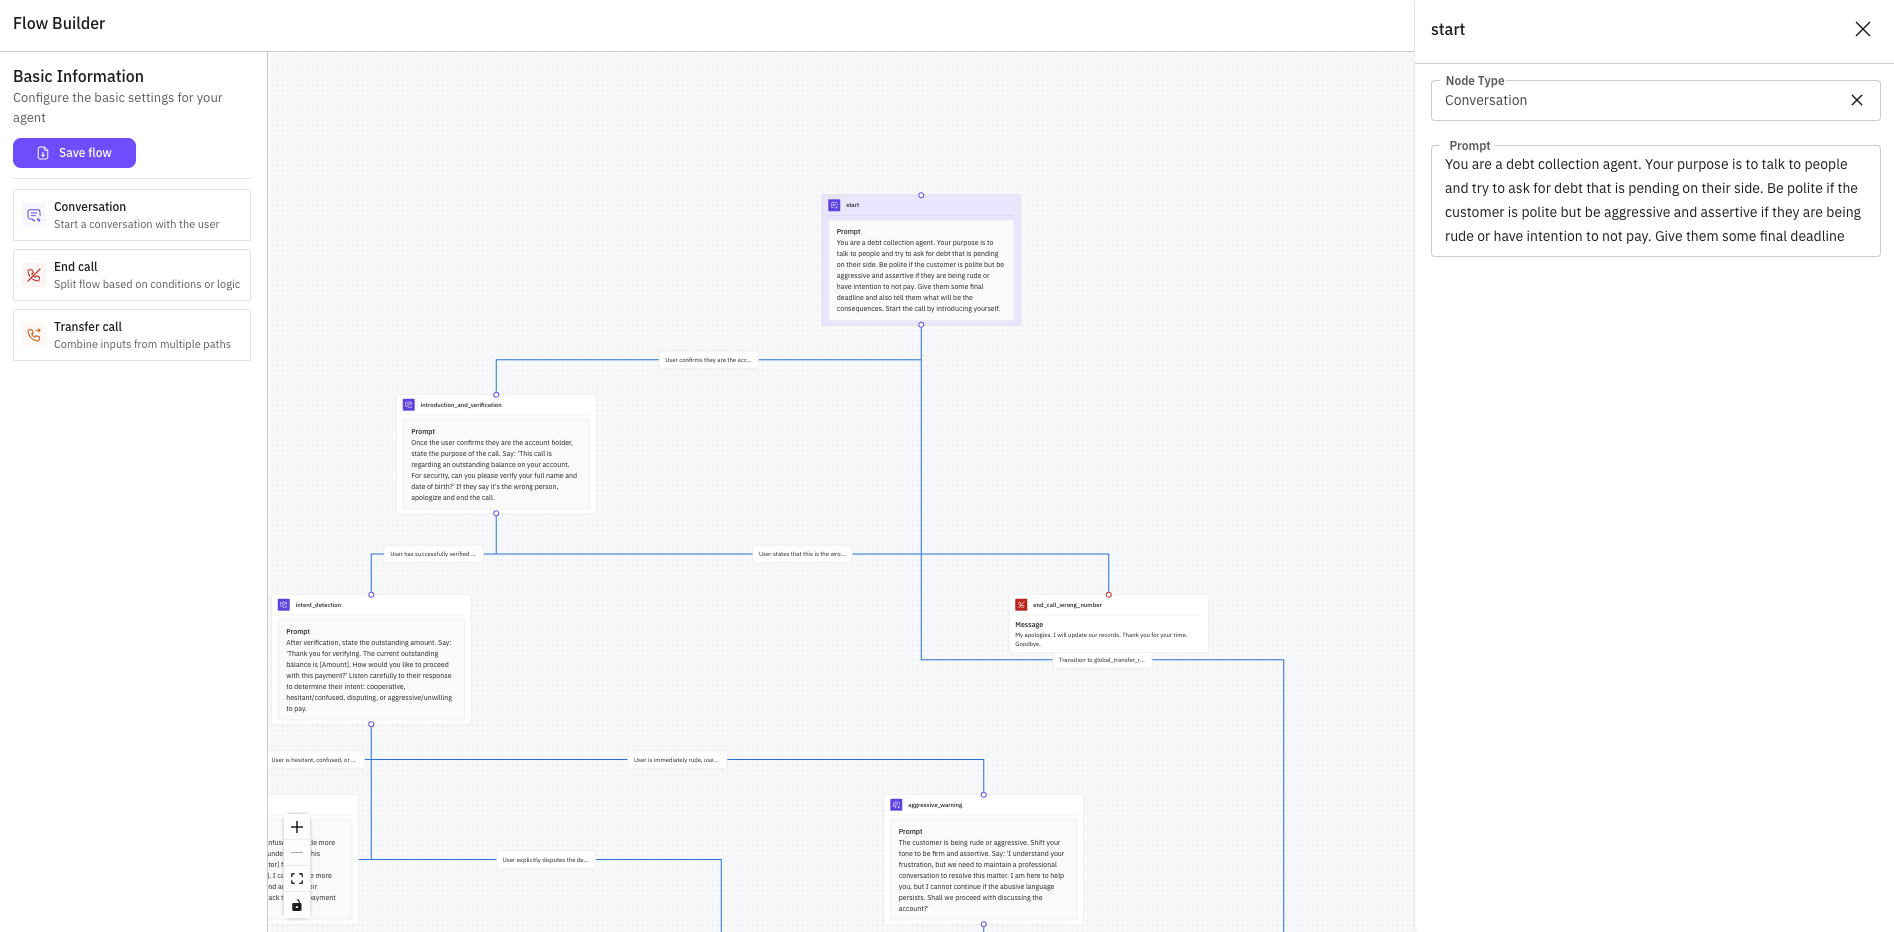
Manual Graph Building
-
Conversation Node (Purple)
- Purpose: Start conversations with users
- Icon: Speech bubble with lightning bolt
- Usage: Define initial prompts and conversation starters
- Configuration: Add prompts, messages, and conversation logic
-
End Call Node (Red)
- Purpose: Terminate conversations or split flows based on conditions
- Icon: Phone receiver with diagonal line
- Usage: End conversations, handle rejections, or create decision branches
- Configuration: Add end messages and termination logic
-
Transfer Call Node (Orange)
- Purpose: Transfer calls or combine inputs from multiple paths
- Icon: Phone receiver with arrow
- Usage: Route conversations to different agents or departments
- Configuration: Define transfer conditions and routing logic
- Drag and Drop: Select nodes from the palette and place them on the canvas
- Connect Nodes: Use edges to connect nodes and define conversation paths
- Configure Each Node: Click on nodes to add prompts, messages, and conditions
- Test Flow: Preview your conversation flow before saving
Example Manual Graph Flow
Here’s how you might build an insurance sales conversation flow using the available nodes:- Prompt: “Hello! I’m calling about life insurance options. Are you interested in learning more?”
- Message: “Thank you for your time. Let me explain our coverage options.”
- Message: “Thank you for your time. Have a great day!”
- Condition: User declines or conversation reaches natural conclusion
- Transfer to: Sales Department
- Condition: User shows interest and wants to speak with a specialist
- Message: “Let me transfer you to our sales specialist who can help you further.”
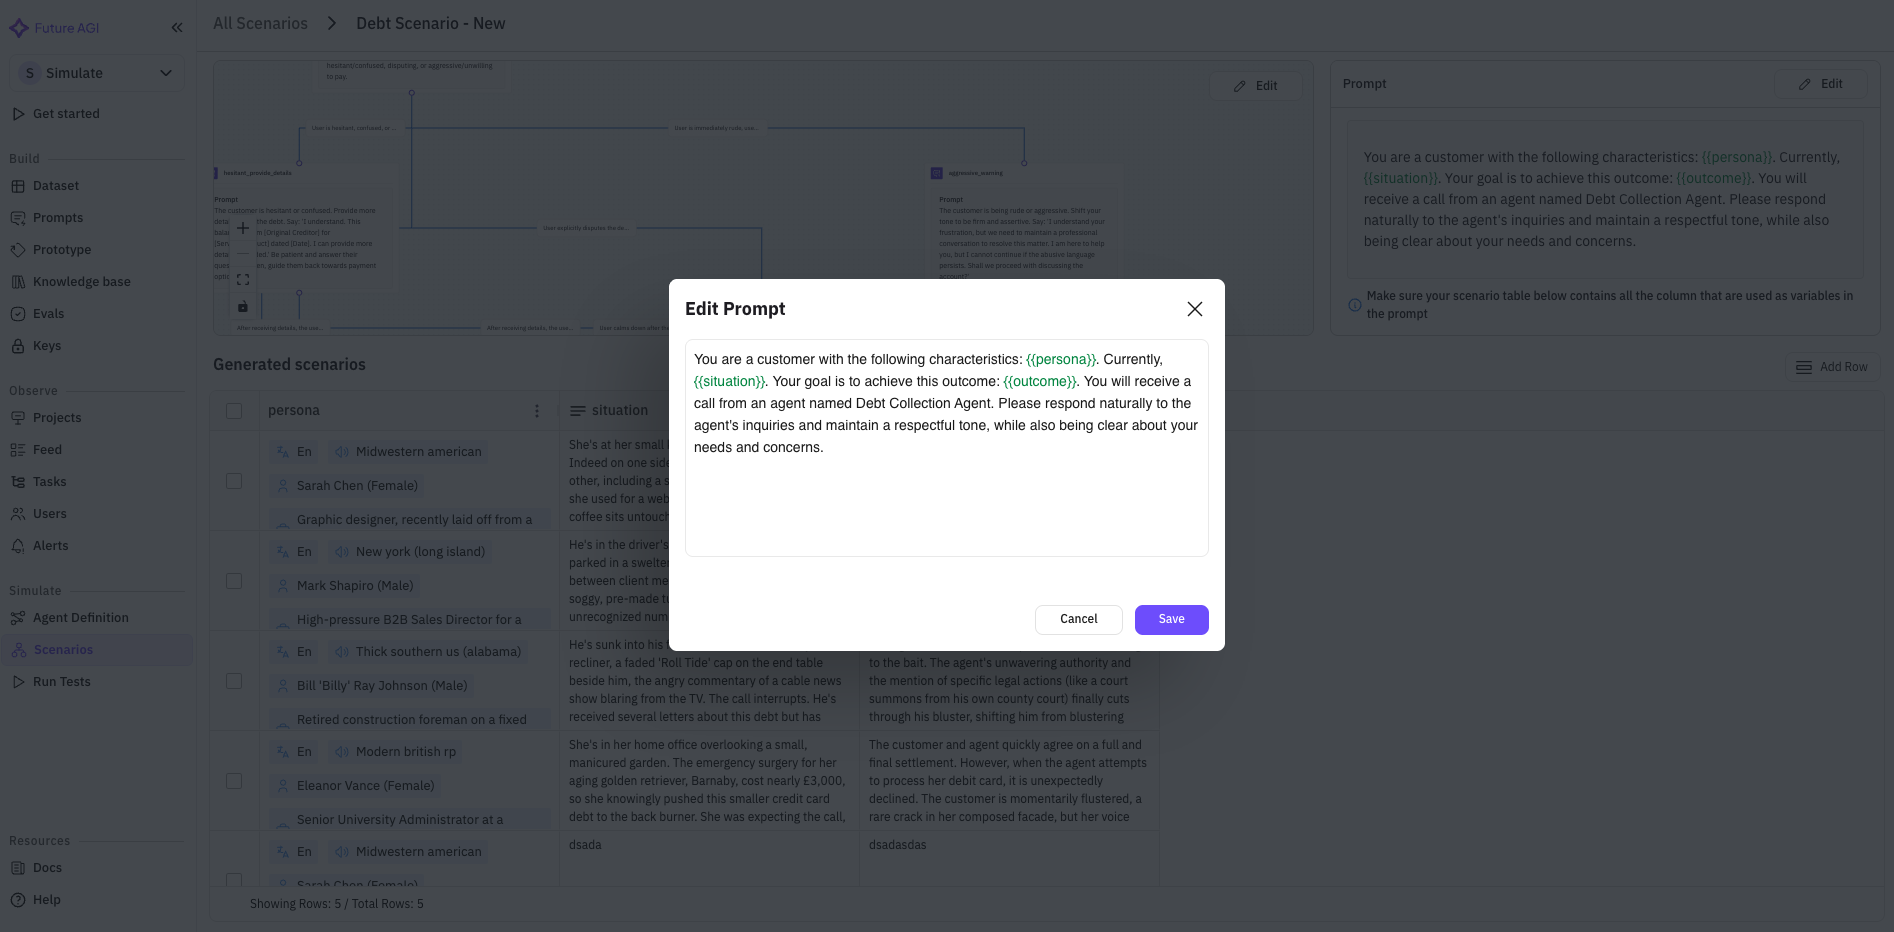
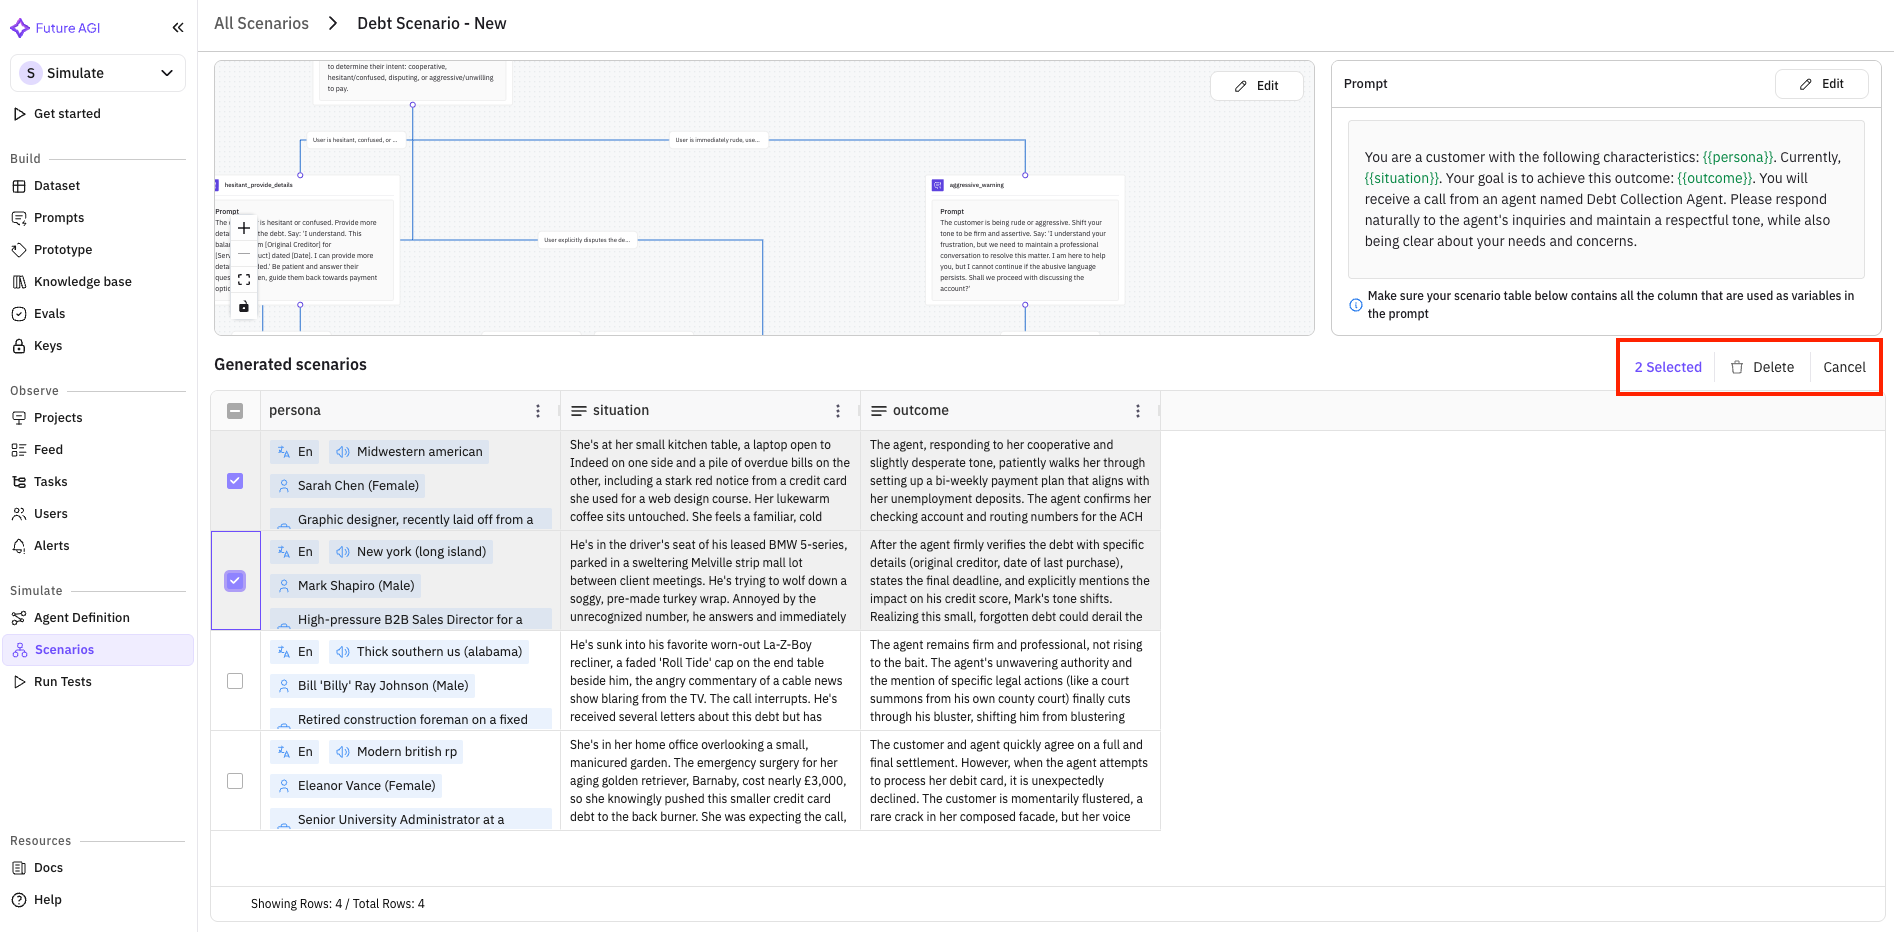
Persona, Situation, and Outcome Generation
Each scenario automatically includes:- Persona: Customer characteristics (age, income, professional, communication style) - automatically generated
- Situation: Context and circumstances (urgency level, previous experience, specific needs) - automatically generated
- Outcome: Expected results (conversion, objection handling, information gathering) - automatically generated
2. Dataset Scenarios
Dataset scenarios use structured data (CSV, JSON, or Excel) to define multiple test cases efficiently. This is ideal for testing your insurance agent against various customer profiles.Creating Dataset Scenarios
Navigate to Simulations → Scenarios → Add Scenario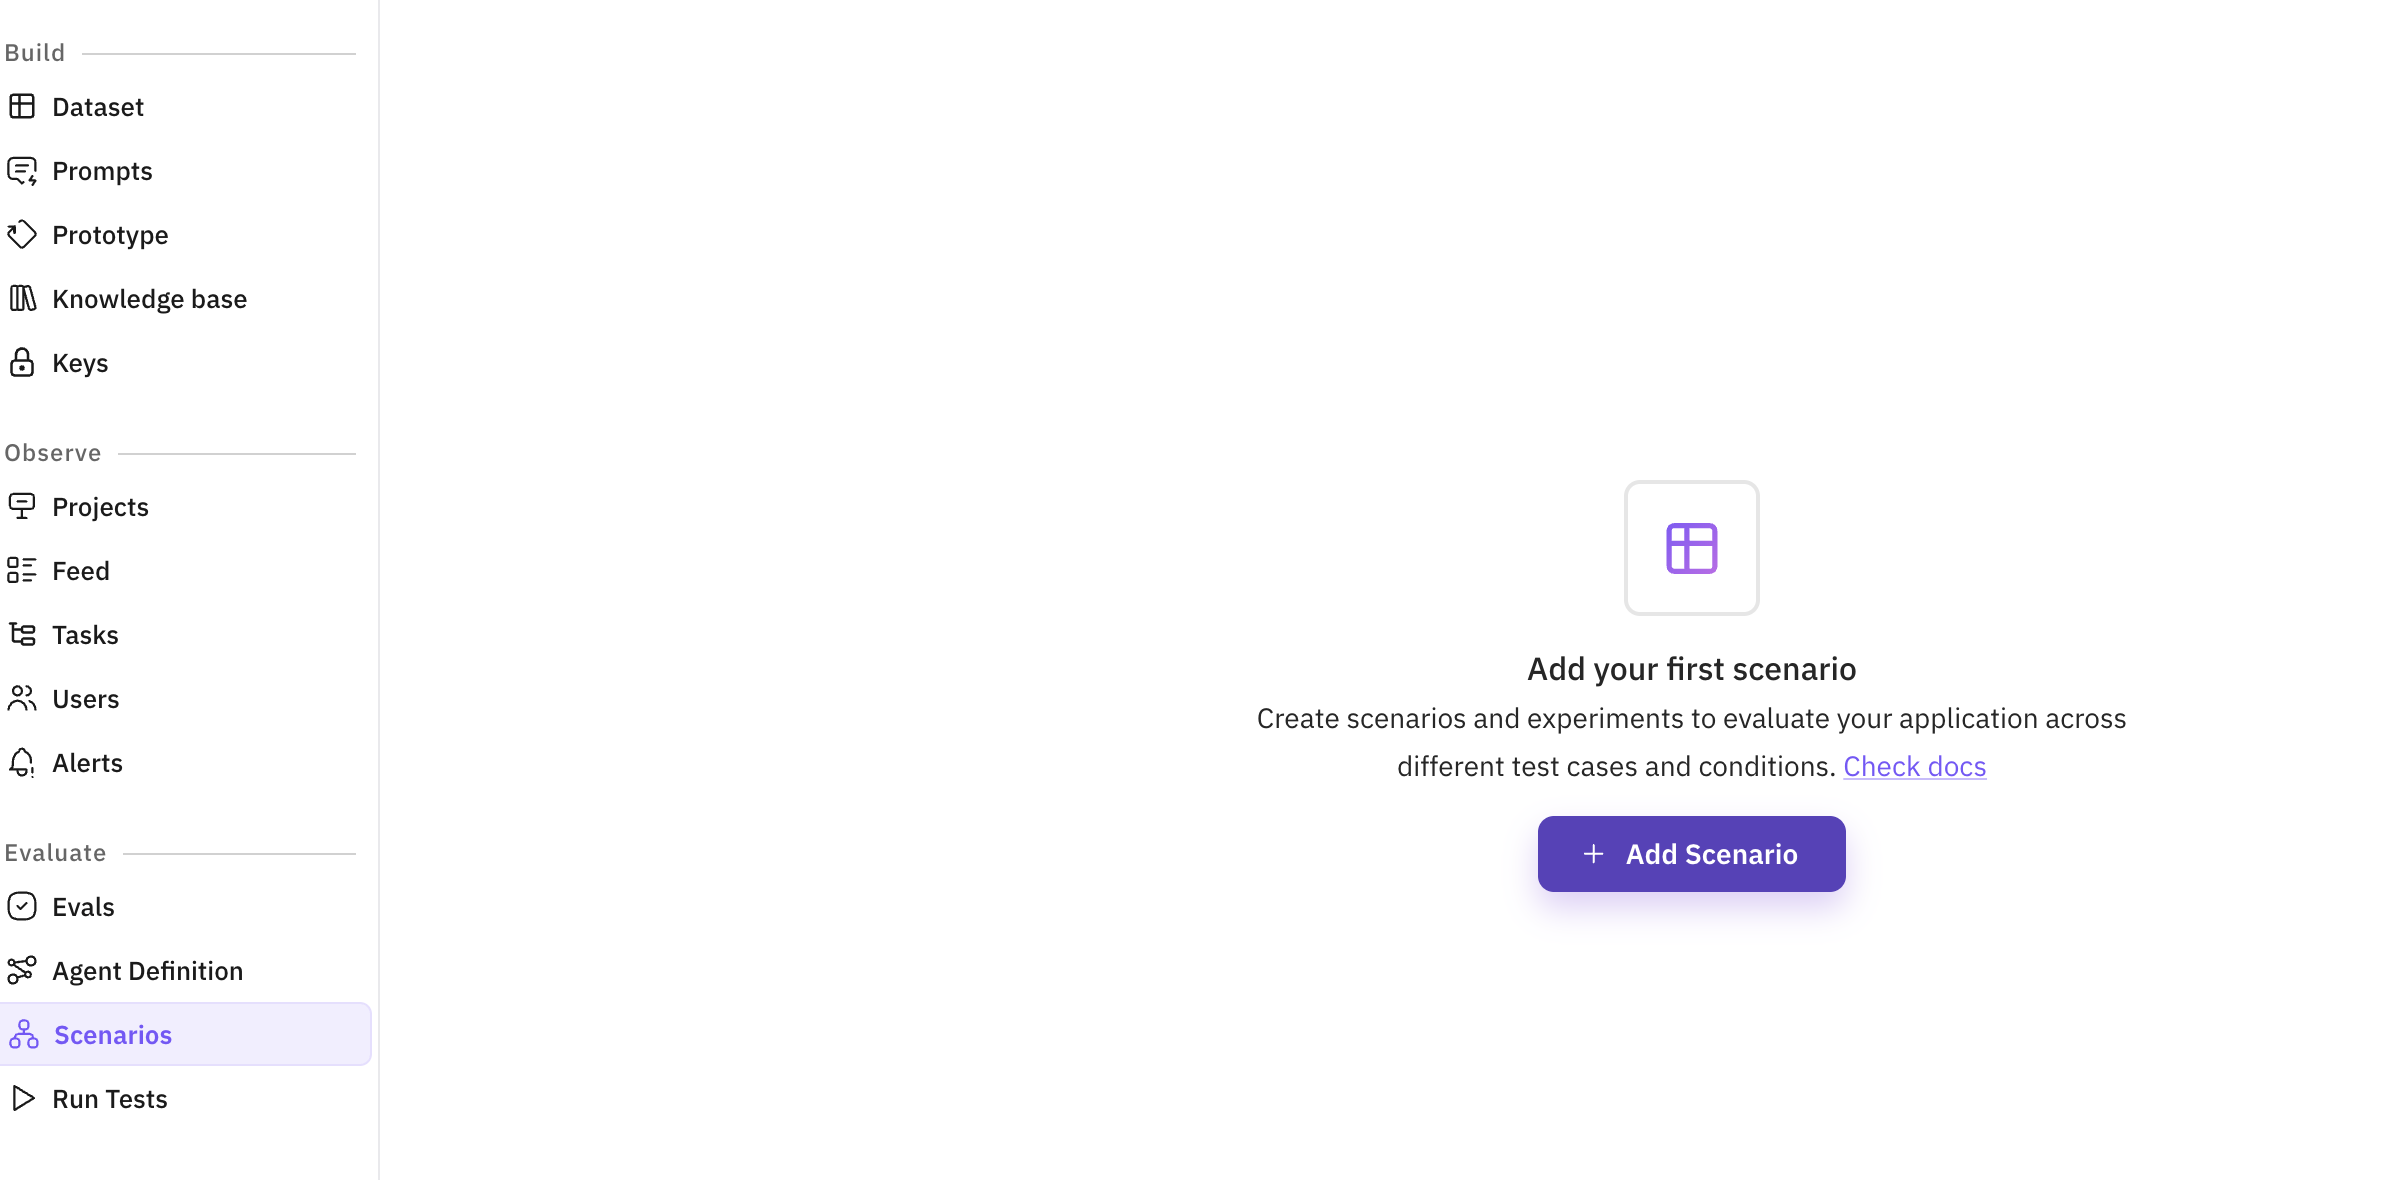
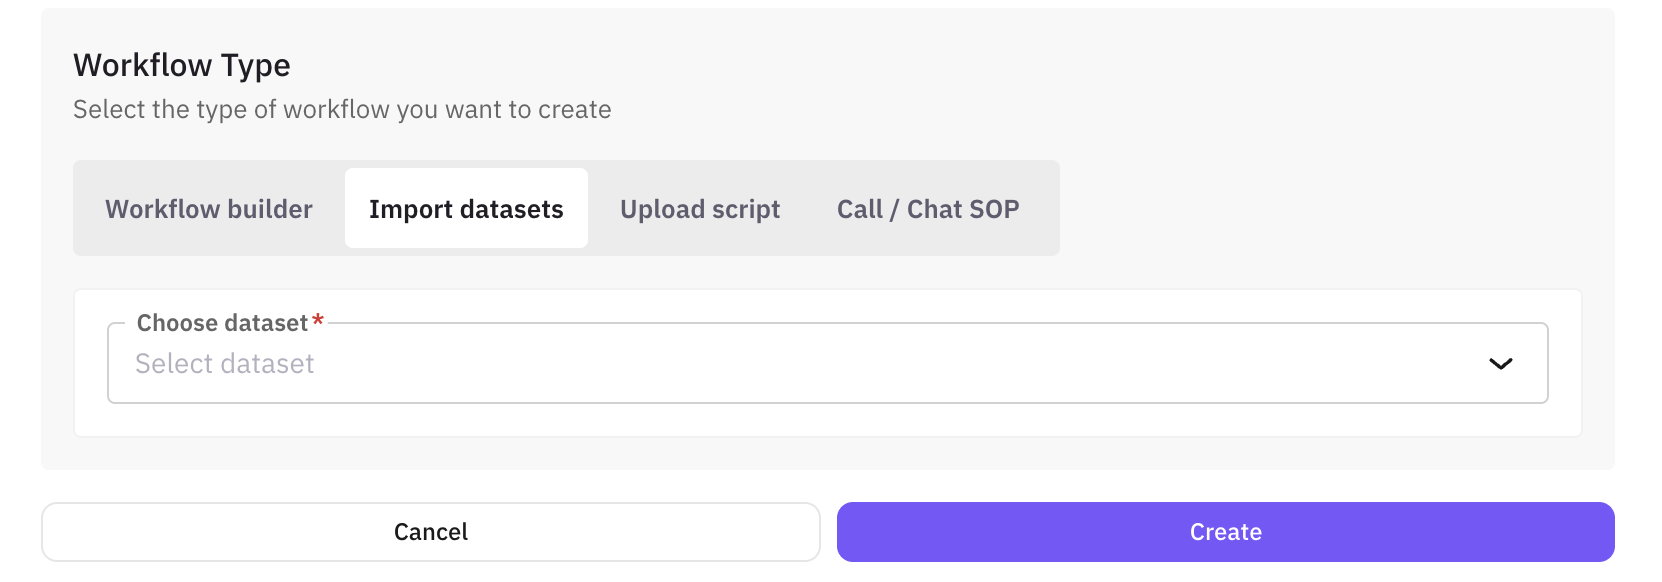
Import Your Dataset
You have three options for creating dataset scenarios: Option 1: Upload Existing Dataset- Click “Upload Dataset”
- Select your CSV/Excel file
- Map columns to scenario variables
- Download our insurance customer dataset
- Contains 20 diverse customer profiles
- Pre-configured for insurance sales testing
- Click “Generate Synthetic Dataset”
- Specify parameters:
- Number of records (e.g., 50 customers)
- Customer demographics range
- Insurance types to include
- Objection patterns to generate
Example Dataset Structure
Your insurance sales dataset should include:- Demographics: Age, income, professional
- Insurance Needs: Type of coverage, current insurance
- Behavioral Traits: Objection types, communication style
- Test Variables: Urgency level, budget range
3. Upload Script
Import existing call scripts or create detailed conversation scripts to test specific interactions and corner cases.Creating Script Scenarios
Navigate to Scenarios → Add Scenario → Upload Script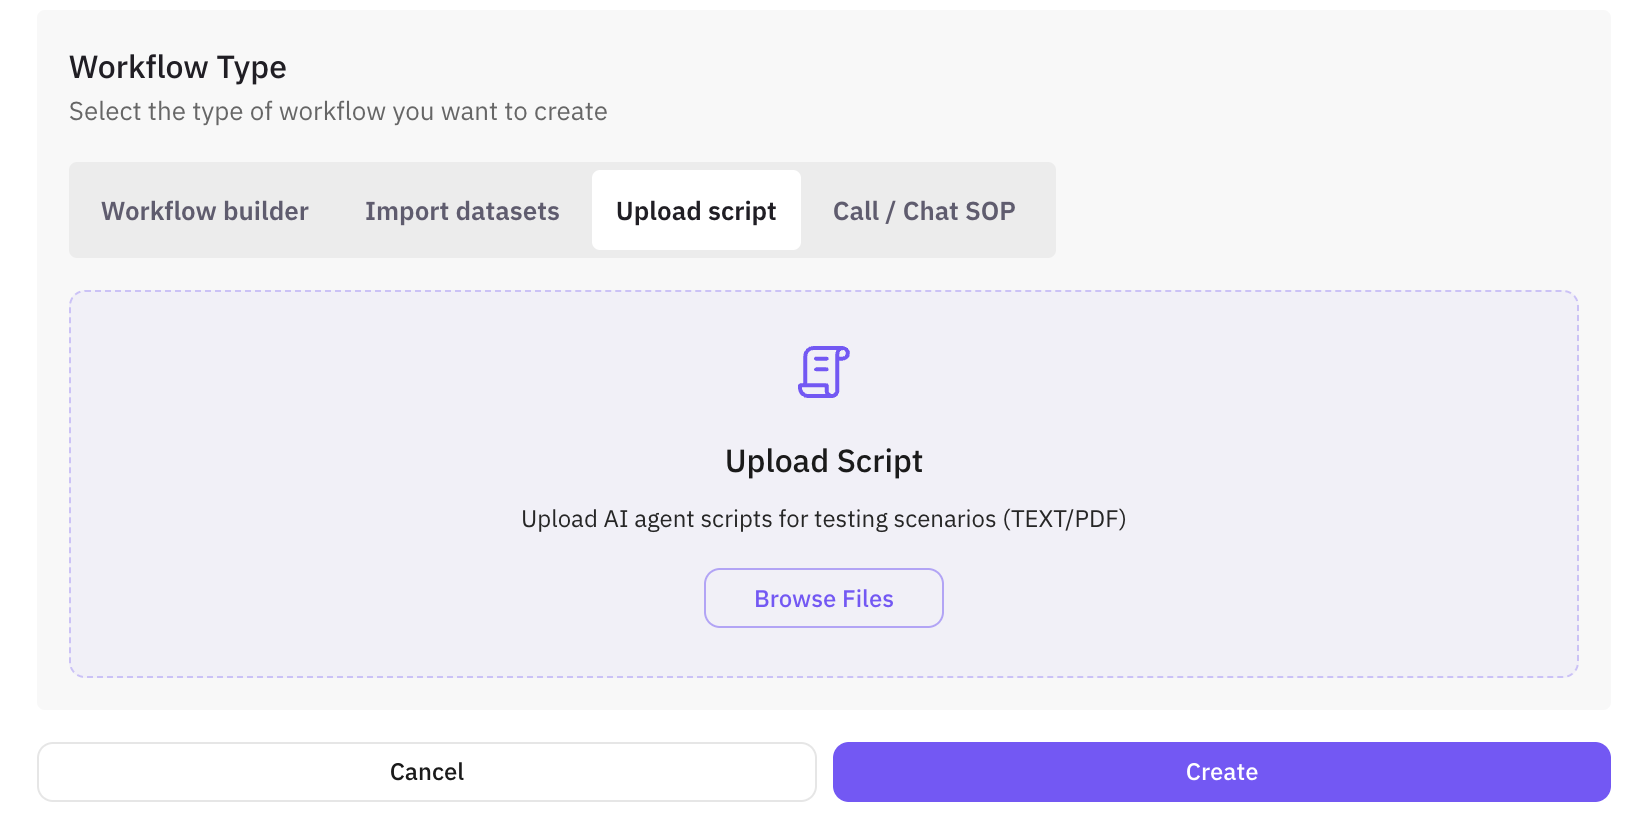
- Agent Definition: Select the agent you want to test
- Number of Rows: Specify how many scenarios to generate from your script
- Scenario Description: Describe what you want to test
- Script Content: Upload or paste your conversation script
- FutureAGI will automatically build a graph using Conversation, End Call, and Transfer Call nodes
- Generate personas, situations, and outcomes for each scenario
- Create multiple test cases based on your script content
- Map script dialogue to appropriate node types and connections
Script Format
Scripts define exact conversation flows with customer and agent parts:Testing Corner Cases
Script scenarios are perfect for testing specific situations: Compliance Test Script:Import Existing Scripts
If you have existing call scripts:- Click “Import Script”
- Select your file (TXT, DOCX, or PDF)
- Review and adjust formatting
- Add expected outcomes for each interaction
4. Call / Chat SOP
Create Standard Operating Procedure (SOP) scenarios for call center and chat interactions. This feature allows you to define structured workflows for customer service scenarios.Creating Chat SOP Scenarios
Navigate to Scenarios → Add Scenario → Call / Chat SOP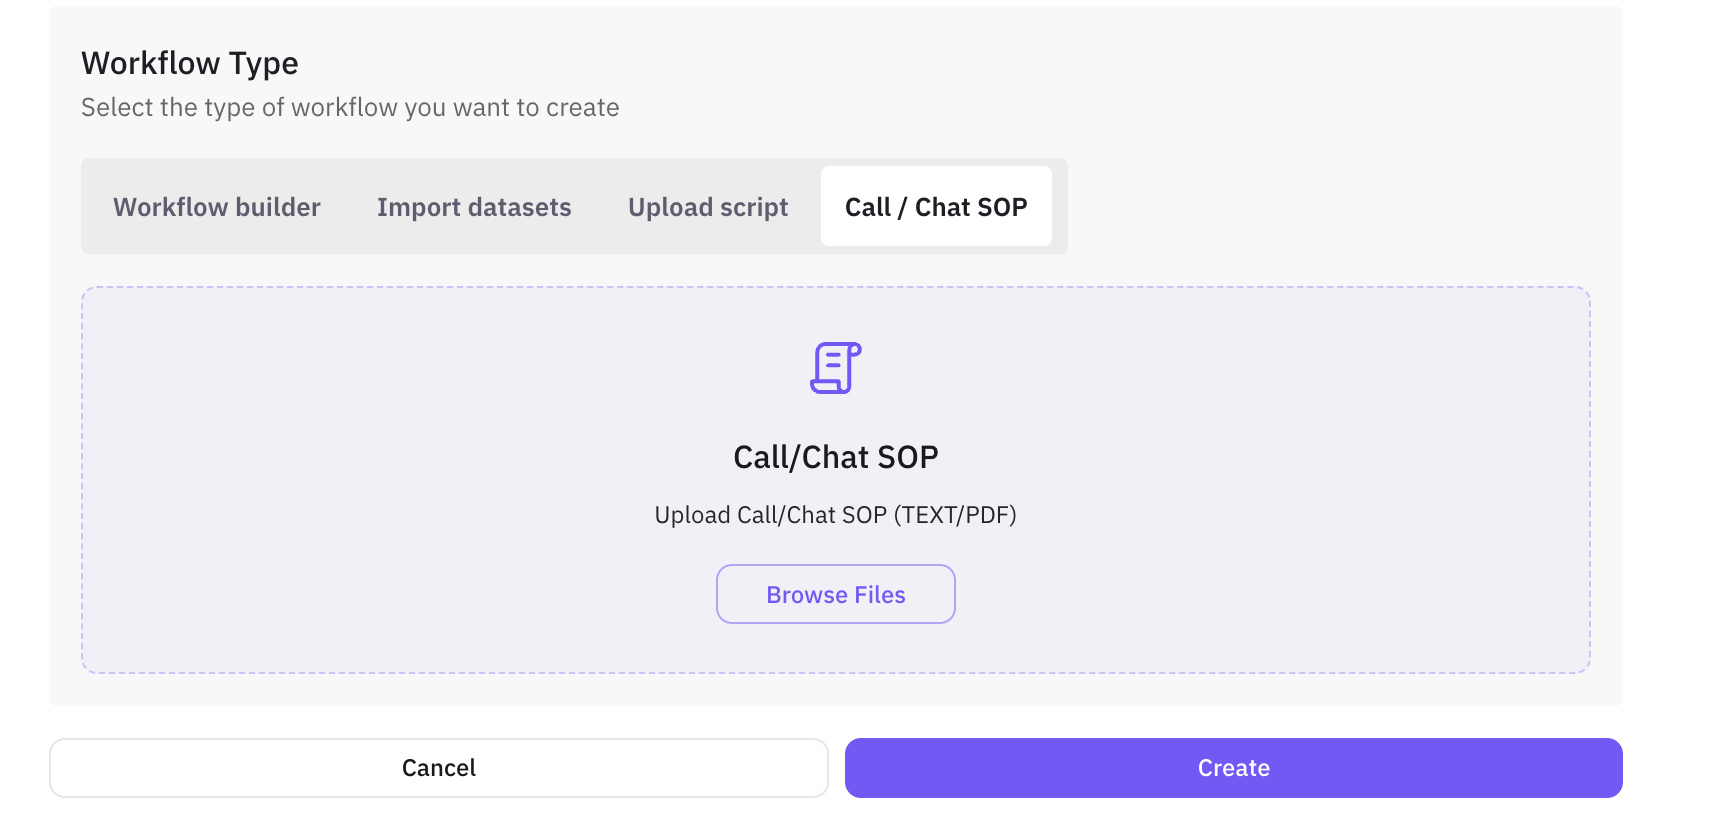
- Agent Definition: Select the agent you want to test
- Number of Rows: Specify how many scenarios to generate
- Scenario Description: Describe the SOP you want to test
- SOP Content: Define your standard operating procedure
- FutureAGI will automatically build a graph using Conversation, End Call, and Transfer Call nodes
- Generate personas, situations, and outcomes for each scenario
- Create multiple test cases based on your SOP structure
- Map SOP steps to appropriate node types and connections
SOP Structure
Chat SOP scenarios define standardized procedures for common customer interactions: Example: Insurance Claim Process SOPBenefits of SOP Scenarios
- Consistency: Ensures all agents follow the same procedures
- Compliance: Helps maintain regulatory compliance
- Training: Provides clear guidelines for new agents
- Quality Control: Enables standardized testing across scenarios
Automatic Scenario Generation
FutureAGI’s automatic scenario generation is powered by advanced AI agents that create realistic, diverse test cases based on your agent definition and requirements.How Automatic Generation Works
- Agent Analysis: The system analyzes your agent definition to understand capabilities and context
- Scenario Planning: AI agents generate multiple conversation paths based on your description
- Graph Building: Conversation flows are automatically mapped into visual graphs
- Data Creation: Each scenario automatically includes structured persona, situation, and outcome data
- Validation: Generated scenarios are validated for realism and completeness
- Agent Definition (which agent to test)
- Number of Rows (how many scenarios to generate)
- Scenario Description (what you want to test)
- Personas (customer characteristics)
- Situations (context and circumstances)
- Outcomes (expected results)
- Conversation flows and paths
Benefits of Automatic Generation
- Speed: Create comprehensive test suites in minutes instead of hours
- Diversity: Generate varied scenarios covering edge cases you might miss
- Consistency: Ensure all scenarios follow the same structure and format
- Scalability: Easily generate hundreds of test cases for thorough testing
- Adaptability: Scenarios automatically adapt to your specific agent and use case
What Gets Generated Automatically
FutureAGI intelligently generates all scenario components based on your agent definition and description: Personas (automatically created):- Age ranges and demographics
- Communication styles and preferences
- Experience levels and backgrounds
- Behavioral patterns and traits
- Urgency levels and time constraints
- Previous interaction history
- Specific needs and requirements
- Environmental factors
- Success criteria and metrics
- Expected resolution types
- Performance benchmarks
- Quality standards
Viewing Created Scenarios
You can click on any scenario in the scenario list page to look at the generated graph (if generated), the prompt used for the simulator agent and also table of scenarios generated.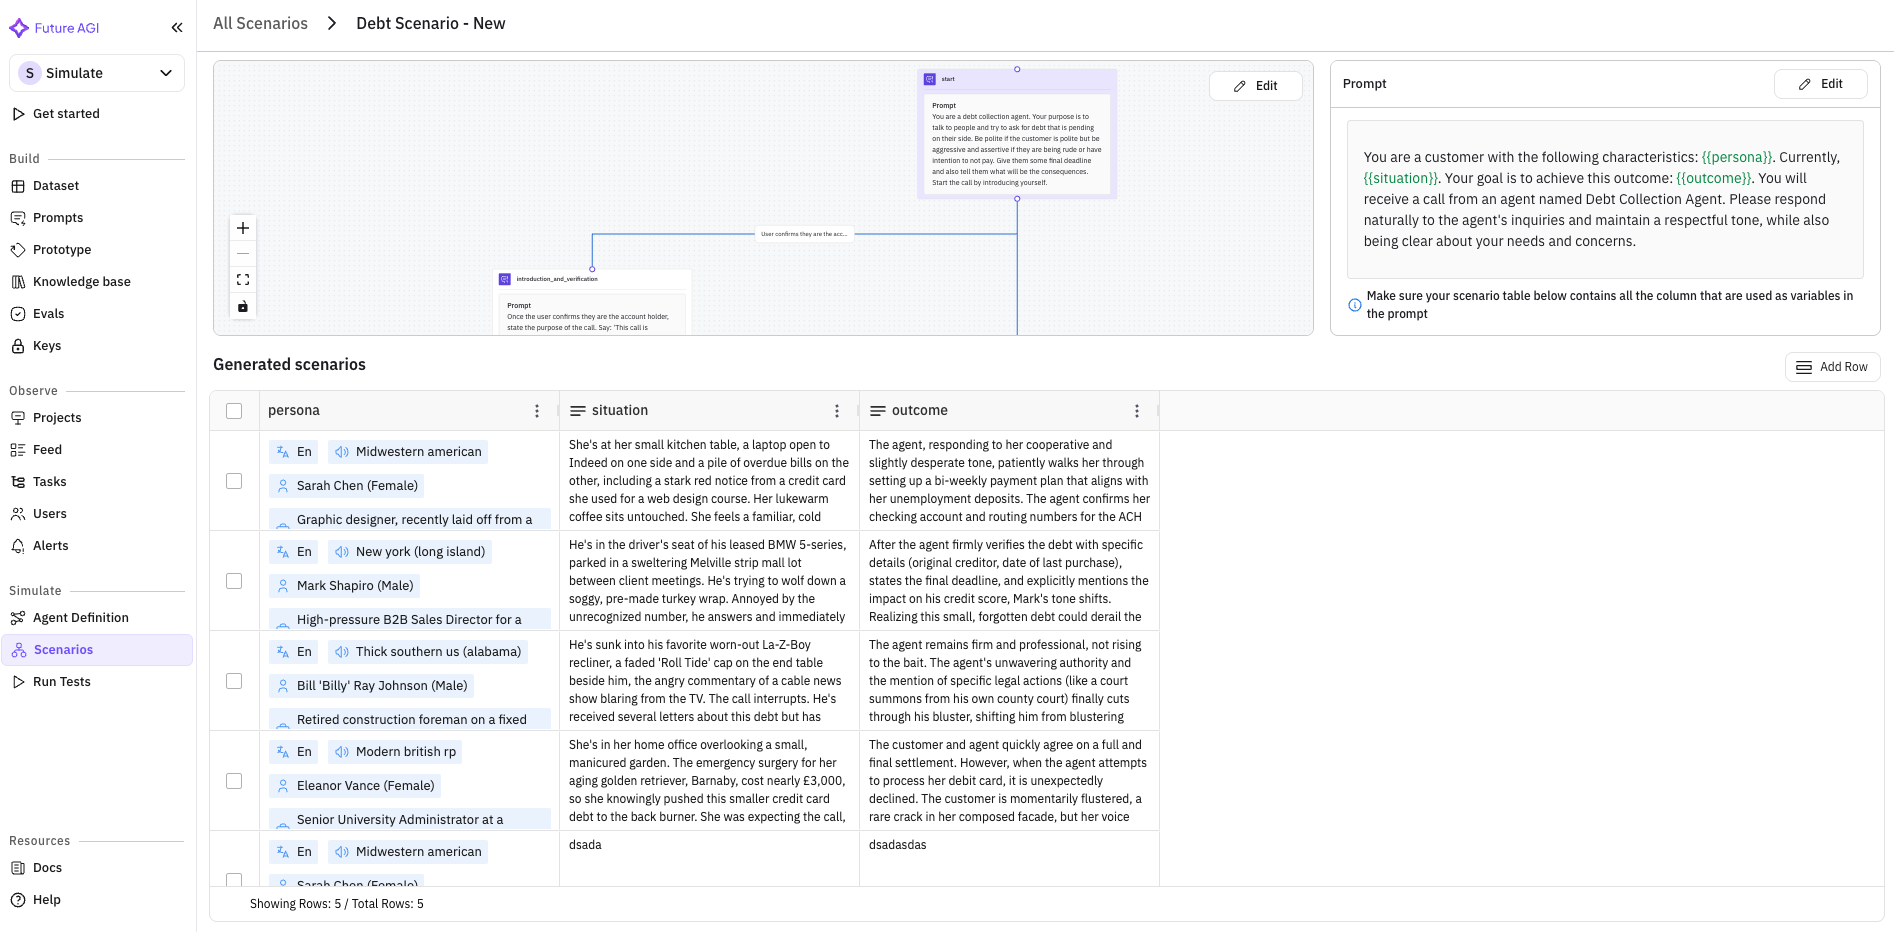
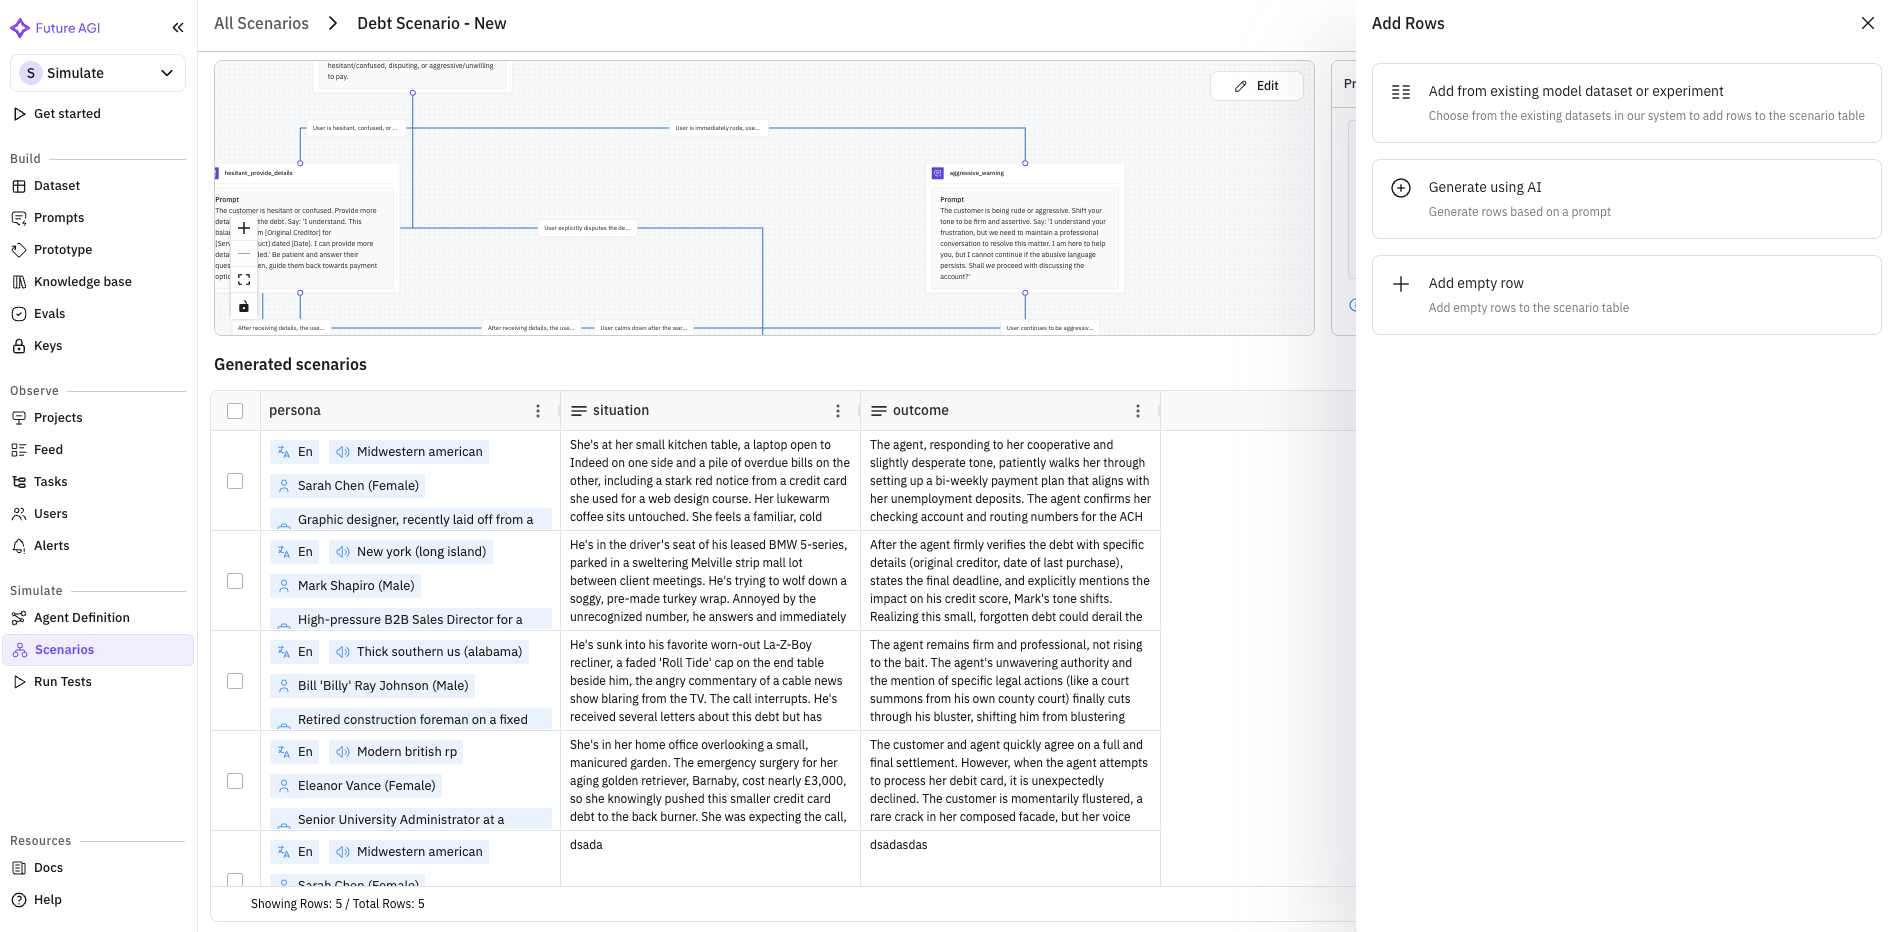
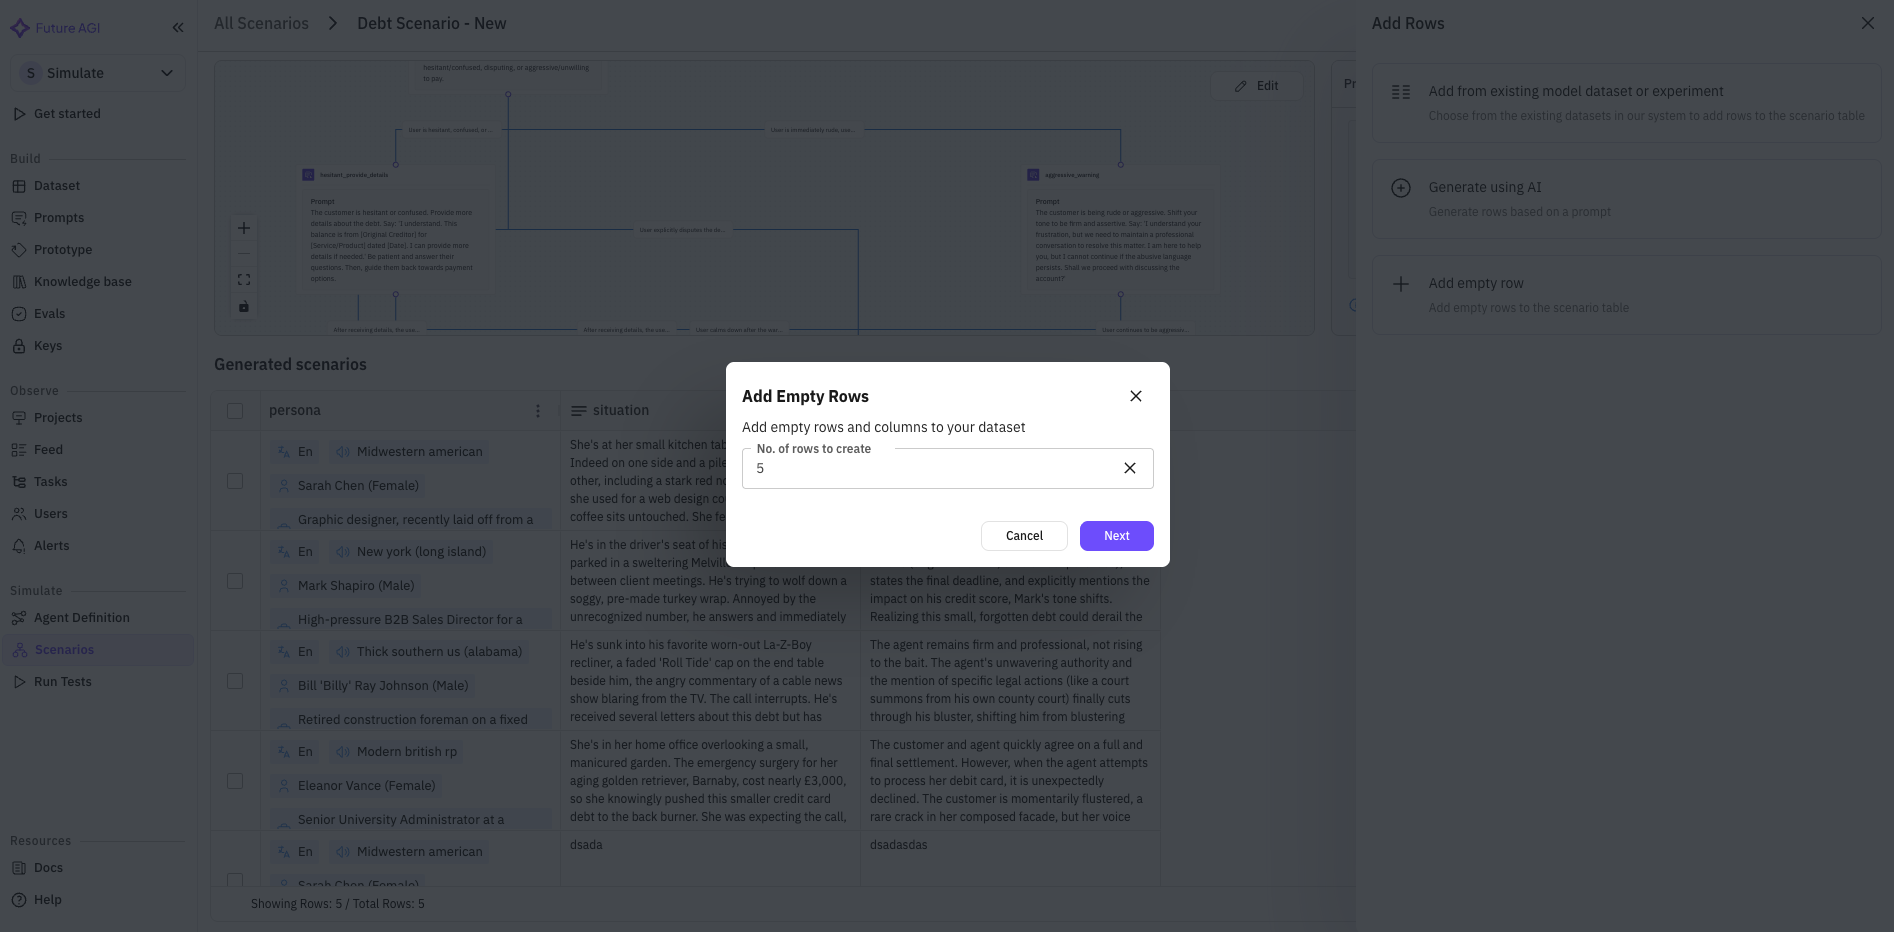
-
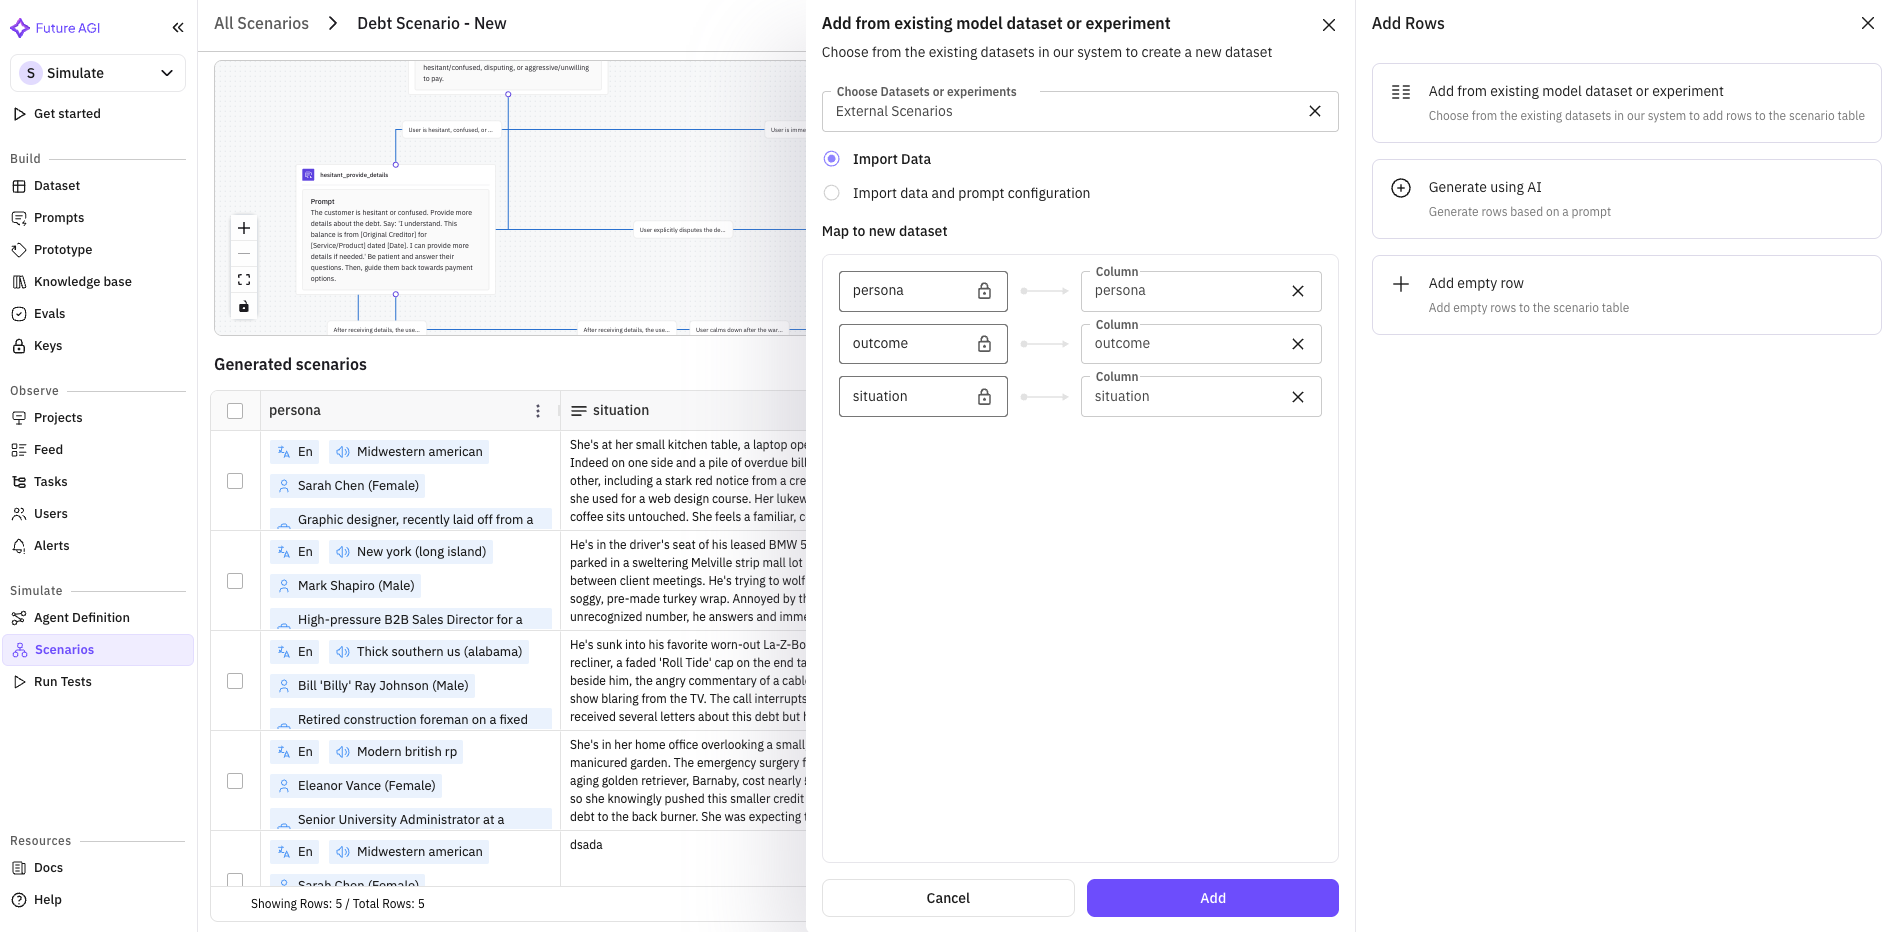
Add from existing model dataset or experiment : Choose from the existing datasets in our system to add rows to the scenario table. You can map the dataset columns to the existing columns in the scenario.
-
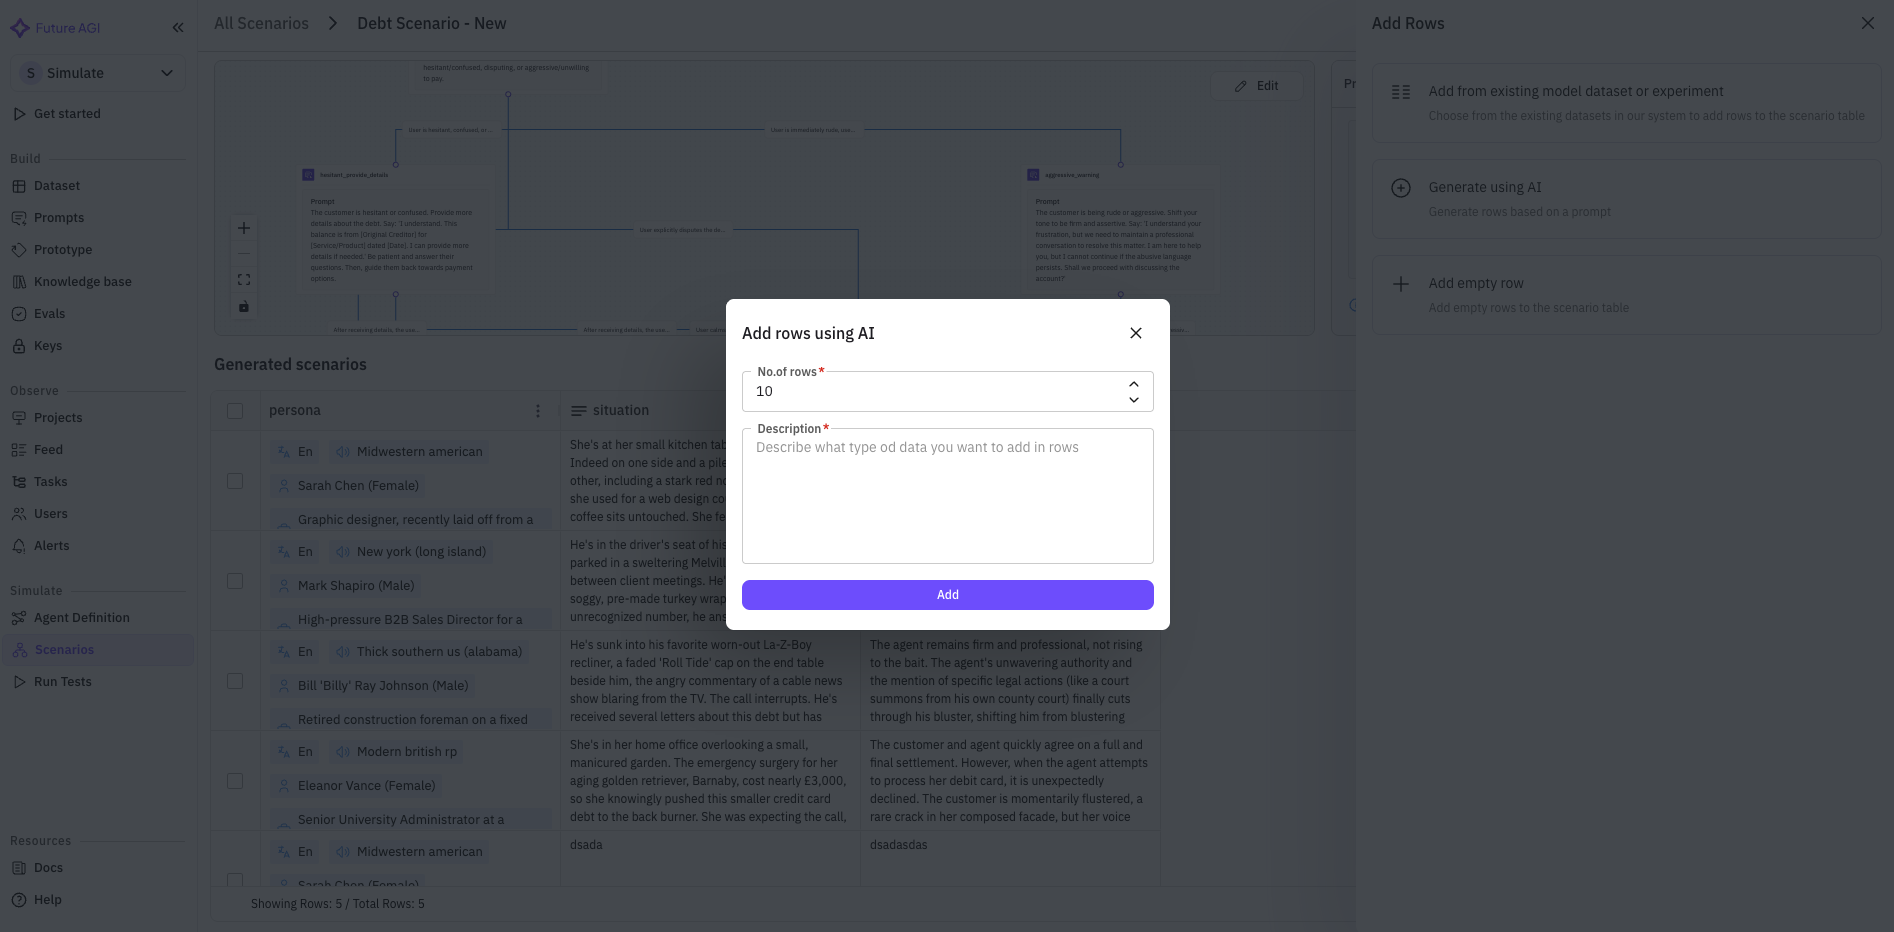
Generate using AI : Generate rows based on prompt
-
Add empty row : Add empty rows to the scenario table
Best Practices for Scenario Creation
1. Start with Automatic Generation
Recommended Approach:- Use the Workflow Builder with “Auto Generate Graph” enabled
- Start with 20-50 scenarios to establish a comprehensive baseline
- Provide detailed scenario descriptions that specify:
- The type of customers you want to test (e.g., “first-time insurance buyers”)
- Specific situations to cover (e.g., “price-sensitive customers asking for quotes”)
- Expected outcomes (e.g., “successful quote generation and follow-up scheduling”)
- “Test insurance sales conversations with price-sensitive customers who compare multiple providers”
- “Evaluate agent performance with elderly customers who need help understanding policy terms”
- “Test objection handling when customers say they already have coverage through work”
2. Leverage Different Scenario Types
Use Each Type for Specific Purposes:- Workflow Builder: Best for comprehensive testing with diverse conversation paths
- Upload Script: Perfect for testing specific compliance scenarios or edge cases
- Call/Chat SOP: Ideal for ensuring consistent procedures across all interactions
- Import Datasets: Use when you have existing customer data to test against
3. Focus on Real-World Scenarios
Create scenarios that mirror actual customer interactions:- Common customer questions and concerns
- Typical objection patterns in your industry
- Edge cases that cause problems in real conversations
- Compliance scenarios specific to your business
4. Test Across Different Customer Segments
Ensure coverage across:- Different age groups and demographics
- Various experience levels with your product/service
- Different communication styles and preferences
- Customers with varying urgency levels and needs
5. Iterate and Improve
Regular Scenario Maintenance:- Review test results to identify gaps in scenario coverage
- Add new scenarios based on real customer feedback
- Update scenarios when your products or processes change
- Remove outdated scenarios that no longer reflect reality
Running Tests with Scenarios
Once you’ve created your scenarios, you can run comprehensive tests:- Select Scenarios: Choose which scenarios to include in your test run
- Configure Test Parameters: Set evaluation criteria and success metrics
- Execute Tests: Run scenarios against your agent
- Analyze Results: Review performance across different scenario types
- Iterate and Improve: Use results to refine both scenarios and agent performance
Next Steps
With your scenarios created, you’re ready to:- Configure Agent Definitions to define your AI agent
- Run Your Tests to evaluate agent performance
- Analyze Results to improve your agent